Record system audio on Mac when your tutorial, demo, or walkthrough needs the app sound to stay clear in the final video.
If you are recording a product demo or course lesson, the screen is only half of the story. The same is true for a bug report. Viewers also need to hear the notification, playback, in-app sound, or browser audio that explains what happened. A muted screen recording can make a clear workflow feel incomplete.
Clipa is built for this Mac recording workflow. You can choose what to capture before the take starts. Keep System Audio enabled from the recording panel. Add a microphone or camera when needed. Then move straight into editing and export without rebuilding the project in another app.
What system audio means on Mac
System audio is the sound coming from your Mac. It can include app playback and browser audio. It can also include meeting audio that you are allowed to record, game sound, or alert sounds. It is different from microphone audio, which is your voice or the sound picked up by an external input device.
That difference matters because many Mac recording workflows capture the microphone more easily than internal app sound. Apple's built-in screen recording flow explains how to choose a microphone for narration. It does not turn every recording into a finished app-audio workflow by itself. See Apple's guide to recording your Mac screen for the built-in capture path.
For polished screen videos, you usually want three things at the same time:
- screen video that matches the area viewers need to see
- system audio that captures the app or browser sound
- optional microphone audio for narration
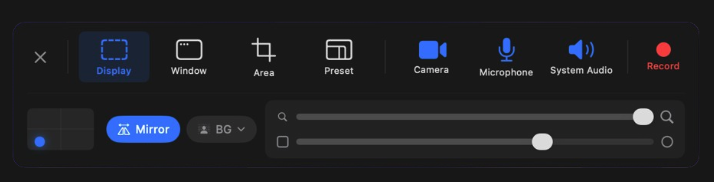
Clipa puts those choices in one recording panel so the setup is visible before you press Record.
How to record system audio on Mac with Clipa
The shortest path is to set up the recording before the first take. Do not wait until editing to discover that the app sound was missing.
- Open Clipa and start from the recording panel.
- Choose a capture mode: Display, Window, Area, or Preset.
- Leave System Audio enabled if the app or browser sound should be part of the recording.
- Enable Microphone when you want voice narration.
- Enable Camera only when a presenter view helps the video.
- Record a short test clip before a long session.
- Play the clip back and confirm the system audio is present.
A short test clip saves time. It also catches the practical issues that often ruin a longer take. You may have the wrong output device selected. The browser tab may be muted. A meeting app may be using a separate audio route. A quick playback check exposes those problems before the real recording starts.
Record system audio on Mac without mixing it up with your mic
A clean tutorial often needs both app sound and voice. The mistake is treating them as one thing. Your microphone explains the workflow. System audio proves what the app, website, or video actually did.
Use headphones when the microphone is on. This reduces the chance that speaker playback will leak into your voice track. Keep your narration at a steady distance from the mic. If you are recording a web app, play the loudest expected sound during your test clip and listen for distortion.
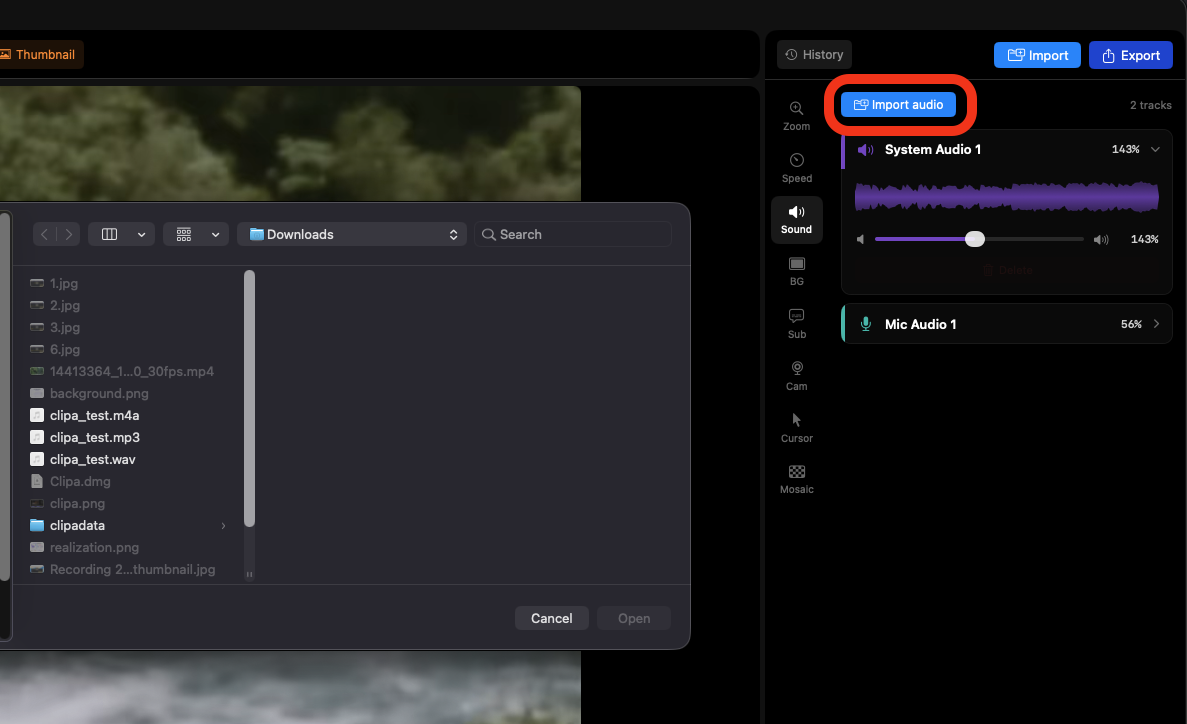
Clipa's recording panel separates the System Audio and Microphone toggles. That makes it easier to decide what belongs in the take. For a silent product walkthrough, you may only need system audio. For a teaching video, you may want both. For a bug report, system audio can be useful when the issue involves notification sounds or media playback.
Check macOS permissions before the real take
Modern macOS protects screen and audio capture through privacy controls. If an app cannot access the required capture surface, the recording can fail or miss part of the intended input. Apple documents this in the Screen and System Audio Recording privacy settings.
Before a high-stakes recording, open System Settings and confirm Clipa is allowed to record the screen and system audio. Also check Microphone permission if you plan to narrate. After changing a permission, quit and reopen the app if macOS asks you to do so.
This is not busywork. Permission problems look like product problems when they appear during a deadline. A two-minute setup check keeps the capture workflow predictable.
Why Clipa is useful after capture
Recording system audio is important, but the finished video still needs editing. Raw screen recordings often include a slow start and dead time while you switch windows. They may also include repeated clicks or audio that starts before the visual context is clear.
Clipa keeps the workflow inside one Mac app. After recording, you can trim the start and end. You can tighten pacing, use zoom effects for key clicks, and prepare an export for the channel where the video will live. If the recording is for YouTube or a course platform, the edit should help viewers understand the action without replaying the clip several times. The same is true for a support ticket.
A practical editing pass can look like this:
- remove setup time before the first meaningful action
- keep system audio where it explains the workflow
- lower or cut distracting sections when they do not help the viewer
- add zoom emphasis when a button or menu is easy to miss
- export at a resolution and frame rate that match the destination
Apple's ScreenCaptureKit is the modern framework for high-performance screen capture on macOS, including screen and audio capture for apps that build this workflow. Apple's ScreenCaptureKit documentation is useful background if you want to understand the capture layer behind modern Mac recording tools.
When QuickTime is enough and when it is not
QuickTime Player is fine for simple screen recordings. It is already on the Mac. It can capture a screen recording and can include microphone narration through the built-in recording options. That is useful for a fast explanation or a one-off visual note.
The limits show up when the recording needs to sound like the actual app experience. If the viewer needs to hear product audio or browser playback, system audio should be a first-class capture choice. The same applies to alert sounds and media previews. If the video also needs trimming, zoom emphasis, export presets, and sharing, a dedicated screen-recording editor reduces the number of handoffs.
Clipa is a better fit when the goal is not just to make a file. It is for turning a Mac screen recording into a clear video that someone else can watch without extra explanation.
Common system audio recording problems
If your test clip has no app sound, start with the simple checks. Make sure System Audio is enabled in Clipa. Confirm the app or browser tab is not muted. Check the Mac output device. Then review macOS permission settings for screen and system audio recording.
If your voice is too loud compared with the app sound, move the microphone farther away or lower its input level before the next take. If app sound leaks into the mic, use headphones. If a specific app blocks or limits recording, respect that restriction and use an approved source. Some media and communication apps have their own recording policies.
If audio feels late after heavy edits, export a short section and review it before producing the final version. Clipa's recent releases have focused on audio sync reliability for recordings and imported clips, but the right review habit still matters. Always check the exported result, not only the preview.
Export and share the finished recording
Once the recording sounds right, choose export settings that fit the destination. A tutorial for YouTube may need a different resolution or file size target than a support video. A quick bug report may only need a shareable link.
Current Clipa releases support creating a share link after export, with an optional thumbnail for clearer previews. That helps when you need to send a screen recording without attaching a large file. Keep the title and thumbnail specific so the viewer knows what the recording demonstrates before opening it.
For public videos, watch the export once from beginning to end. Listen for missing system audio. Check that narration is understandable. Make sure the first few seconds tell the viewer what the video is about.
A simple recording checklist
Use this checklist before recording anything that depends on app sound:
- System Audio is enabled in Clipa.
- Microphone is enabled only when narration is needed.
- macOS permissions are approved.
- The app or browser tab is not muted.
- Headphones are connected if narration is on.
- A short test clip has been reviewed.
- The export has been checked before sharing.
That process is simple, but it prevents the most common failure: recording a perfect visual take with missing sound.
Record cleaner Mac videos with Clipa
If you need to record system audio on Mac, Clipa gives you a focused path from capture to edit to export. The system audio control is visible before recording. The editor is ready when the take ends. The export and sharing flow stays inside the same Mac-native workflow.
Download Clipa at https://www.clipa.studio and use it for your next tutorial, product demo, course lesson, or support video.