
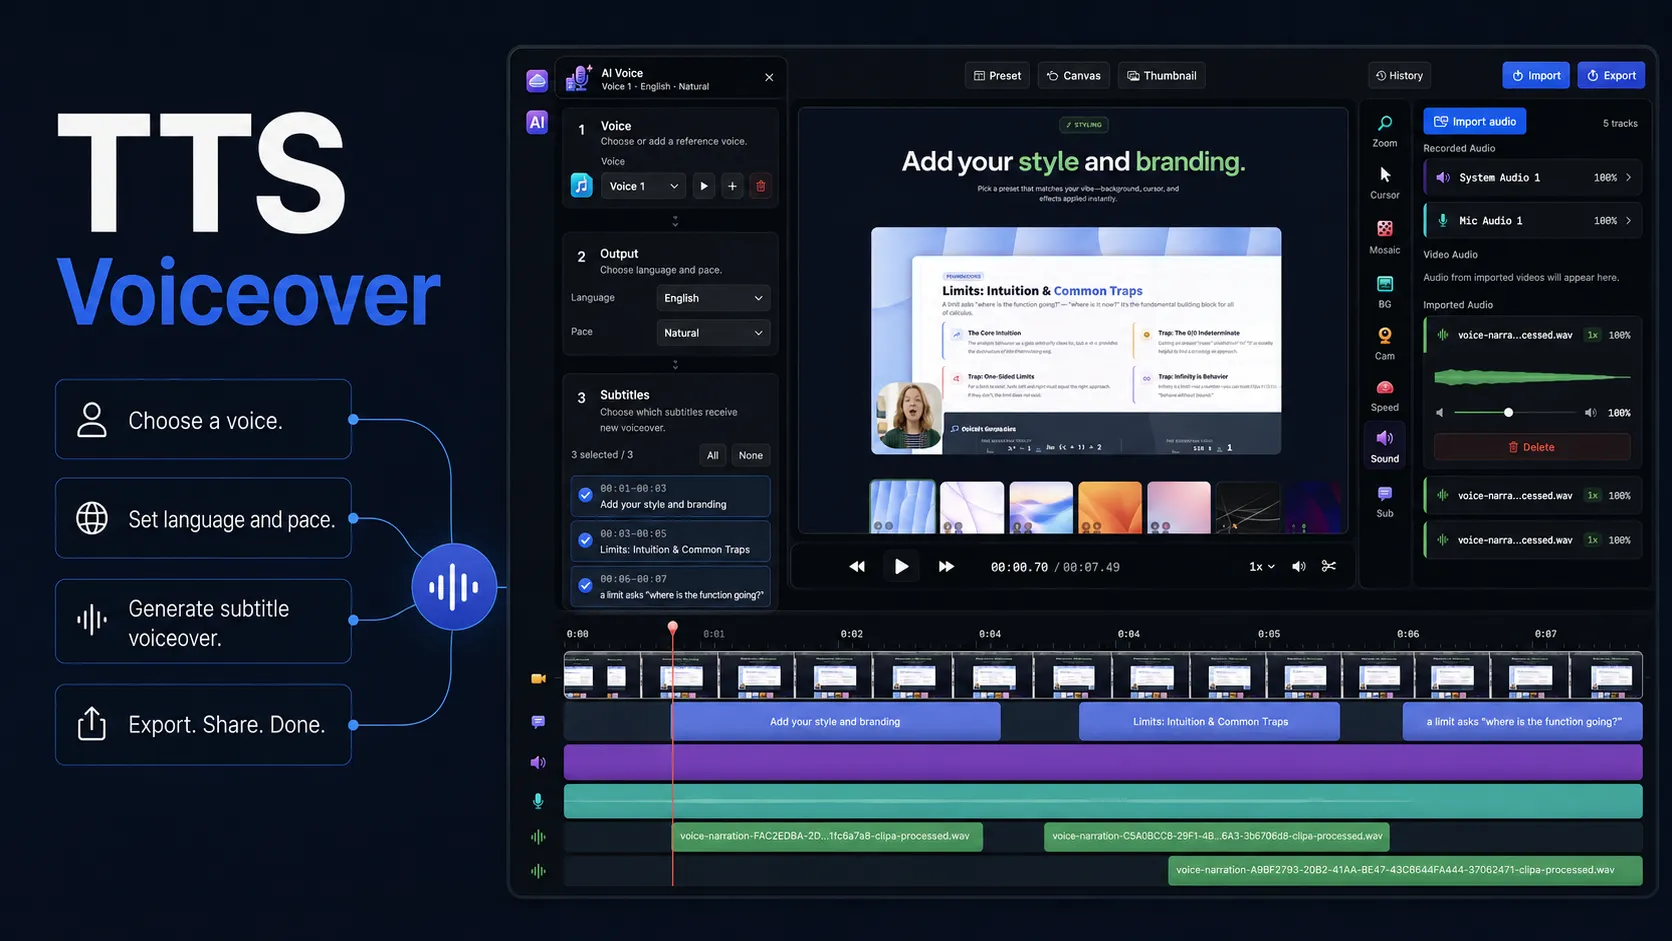
Text to speech for video is useful when your Mac tutorial needs clear narration, but recording a perfect take slows you down.
If you make product demos, software tutorials, online lessons, or bug reports, voiceover is often the part that breaks your flow. The screen recording may be clear. The clicks may be easy to follow. The export may look sharp. Then you hit the narration pass and need another clean take.
Text to speech can help, but video work needs more than a spoken text file. The voice has to match the timeline. It needs room for cursor movement, zooms, cuts, and pauses. It also needs a workflow that keeps the script close to the edit.
This guide explains how to approach text to speech for video on Mac, where built-in Mac tools fit, and how Clipa's Voice Narration workflow turns subtitle text into editable voiceover audio inside a screen recording project.
Why text to speech for video needs an editing workflow
Text to speech for video is different from having your Mac read an article aloud. Apple's Read & Speak feature is useful when you want selected text spoken on screen. It is not designed as a timeline voiceover system for a finished video.
A video voiceover has timing pressure. A line may need to start after a click. Another line may need to finish before a zoom segment ends. A short label may sound awkward if the voice model stretches it. A long sentence may cover too many visual steps.
That is why a good workflow starts from the edit. Treat narration as a timeline layer, not as a separate audio file that you paste in at the end. When voiceover sits next to the screen recording, subtitles, zoom effects, and imported audio, you can fix timing before export.
The same principle applies if you record your own voice. Apple documents a direct voiceover recording workflow in iMovie, which is useful for manual narration. Text to speech adds another option. It helps when you already have a script and want consistent narration without repeating takes.
Start with subtitles before generating voice
A reliable text to speech for video workflow starts with subtitles or caption-style script segments. Each segment should describe one visible action or idea. This gives the generated voice a clearer job.
Timed text formats follow the same general idea. The W3C WebVTT specification describes cues as text segments associated with time intervals. You do not need to export WebVTT to use Clipa, but the cue model is a helpful way to think. One text segment should match one moment in the video.
Write subtitles like narration lines, not like a full blog paragraph. Keep each line short enough to fit the visual action. Use punctuation when you want a stop. Split long explanations before the voice starts to sound rushed.
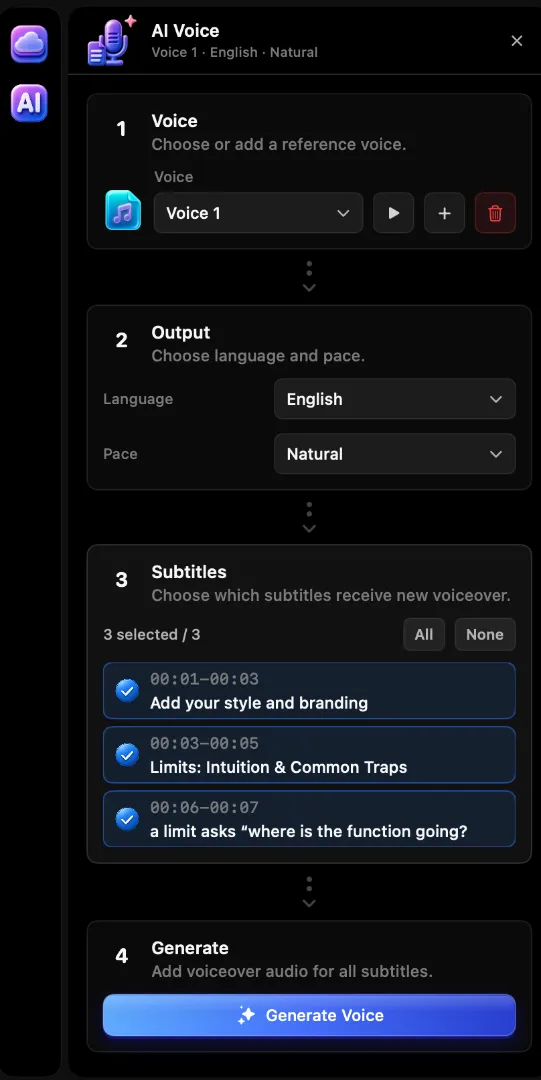
A practical subtitle-to-voiceover pass looks like this:
- Use one subtitle segment for one action.
- Put product names and UI labels exactly as you want them spoken.
- Remove filler words before generation.
- Add punctuation where the voice needs to pause.
- Preview the result against the timeline before export.
This approach keeps the script editable. If the generated voice sounds crowded, change the subtitle text and regenerate the selected segment. If the visual step needs more time, extend the video beat or trim the surrounding edit.
A Mac-native text to speech for video workflow in Clipa
Clipa is built for Mac screen recording and editing, so the voiceover workflow lives near the rest of the project. The current Voice Narration feature is designed to generate local voiceover audio from existing subtitle text and place the result on the timeline as imported audio.
A typical workflow looks like this:
- Record or import your screen video in Clipa.
- Add subtitle text for the moments that need narration.
- Open the AI Voice or Voiceover panel.
- Choose or add a permitted reference voice.
- Install the local voice model if the panel asks for it.
- Choose the output language and narration pace.
- Generate voiceover for all subtitles or selected subtitles.
- Review the generated audio on the timeline.
- Export the finished video from the same project.
The important part is step seven. You do not have to treat the whole script as one long audio file. Clipa can generate voiceover from subtitle segments, then place generated audio near the relevant moments in the edit. That makes the result easier to inspect.
Generated narration behaves like project audio. You can preview it with the rest of the timeline. You can compare it with recorded system audio and microphone audio. You can export it with the final video.
This matters for screen recordings because the visual information is dense. A product demo may show small buttons. A tutorial may depend on cursor movement. A bug report may need a precise explanation. When the voiceover is tied to subtitle segments, you can make the audio follow the screen instead of forcing the screen to follow a long narration track.
Make generated narration sound more natural
Text to speech is still script sensitive. A better script usually creates a better voiceover.
Start by writing for spoken delivery. Use short sentences. Replace dense interface descriptions with direct verbs. Say what the viewer should notice. Do not describe every pixel.
For a software tutorial, this line is easier to voice:
"Click Export, then choose the resolution."
This line is harder:
"After navigating to the export configuration interface, configure the preferred output resolution setting."
The first line has a clear action. It also leaves room for the cursor movement. The second line sounds formal and may run longer than the visual step.
Use punctuation as timing help. A period tells the voice to stop. A comma can create a light pause. A question mark can change the tone. Do not over-punctuate. You want natural speech, not a script that sounds chopped into fragments.
Clipa also exposes narration pace so you can choose a calmer delivery when the video needs more room. Use a slower pace for dense tutorials or course material. Use a natural pace when the edit is already paced well.
Choose the right Mac option for the job
There are several ways to create voiceover on Mac. The right choice depends on how much editing you need.
macOS Read & Speak is useful for quickly hearing text. It is good for reviewing a script or checking tone. It does not create a timeline voiceover layer for your screen recording.
iMovie is useful when you want to record your own narration directly into a video project. That can work well when you are comfortable speaking live and the edit is simple.
Online AI voiceover tools such as Clipchamp, Adobe Firefly, and similar services focus on typed scripts, voice catalogs, and downloadable audio. They can be a good fit for broader marketing videos. They may also add an import and sync step when your source project is a Mac screen recording.
Clipa is a fit when the video is already a screen recording project. You can keep capture, subtitle text, generated voiceover, zoom edits, audio review, and export in one Mac workflow. That reduces the gap between script writing and final timing.
Keep voice permissions and privacy clear
Voice generation should be treated with care. Use voices you own or have permission to use. If a reference voice belongs to another person, get clear permission before creating a profile.
Clipa's Voice Narration workflow is designed as a local-first feature. Reference voice audio, generated voice assets, and related local profile data stay on the user's device unless a separate user-approved upload workflow exists. That is important for creators who are using their own voice in product demos, lessons, or internal walkthroughs.
This also helps keep the feature practical. A screen recording may contain private product screens. A narration script may include customer names, roadmap details, or support context. Keeping the voice workflow close to the project reduces the need to move script and audio assets between unrelated tools.
Export with the voiceover in context
A finished voiceover is not just a generated WAV file. It is part of a complete video. Before export, review the voice with the screen recording, cursor movement, zooms, subtitles, and any background audio.
Mac video work often spans capture and media processing. Apple describes ScreenCaptureKit as a framework for high-performance frame capture of screen and audio content. Apple also describes AVFoundation as a framework for inspecting, playing, capturing, and processing audiovisual media.
For creators, the practical takeaway is simple. Voice timing and export quality are connected. If the voiceover starts late, the viewer misses the action. If the voice is too loud, system audio becomes hard to understand. If the export compresses the audio too much, the tutorial feels less polished.
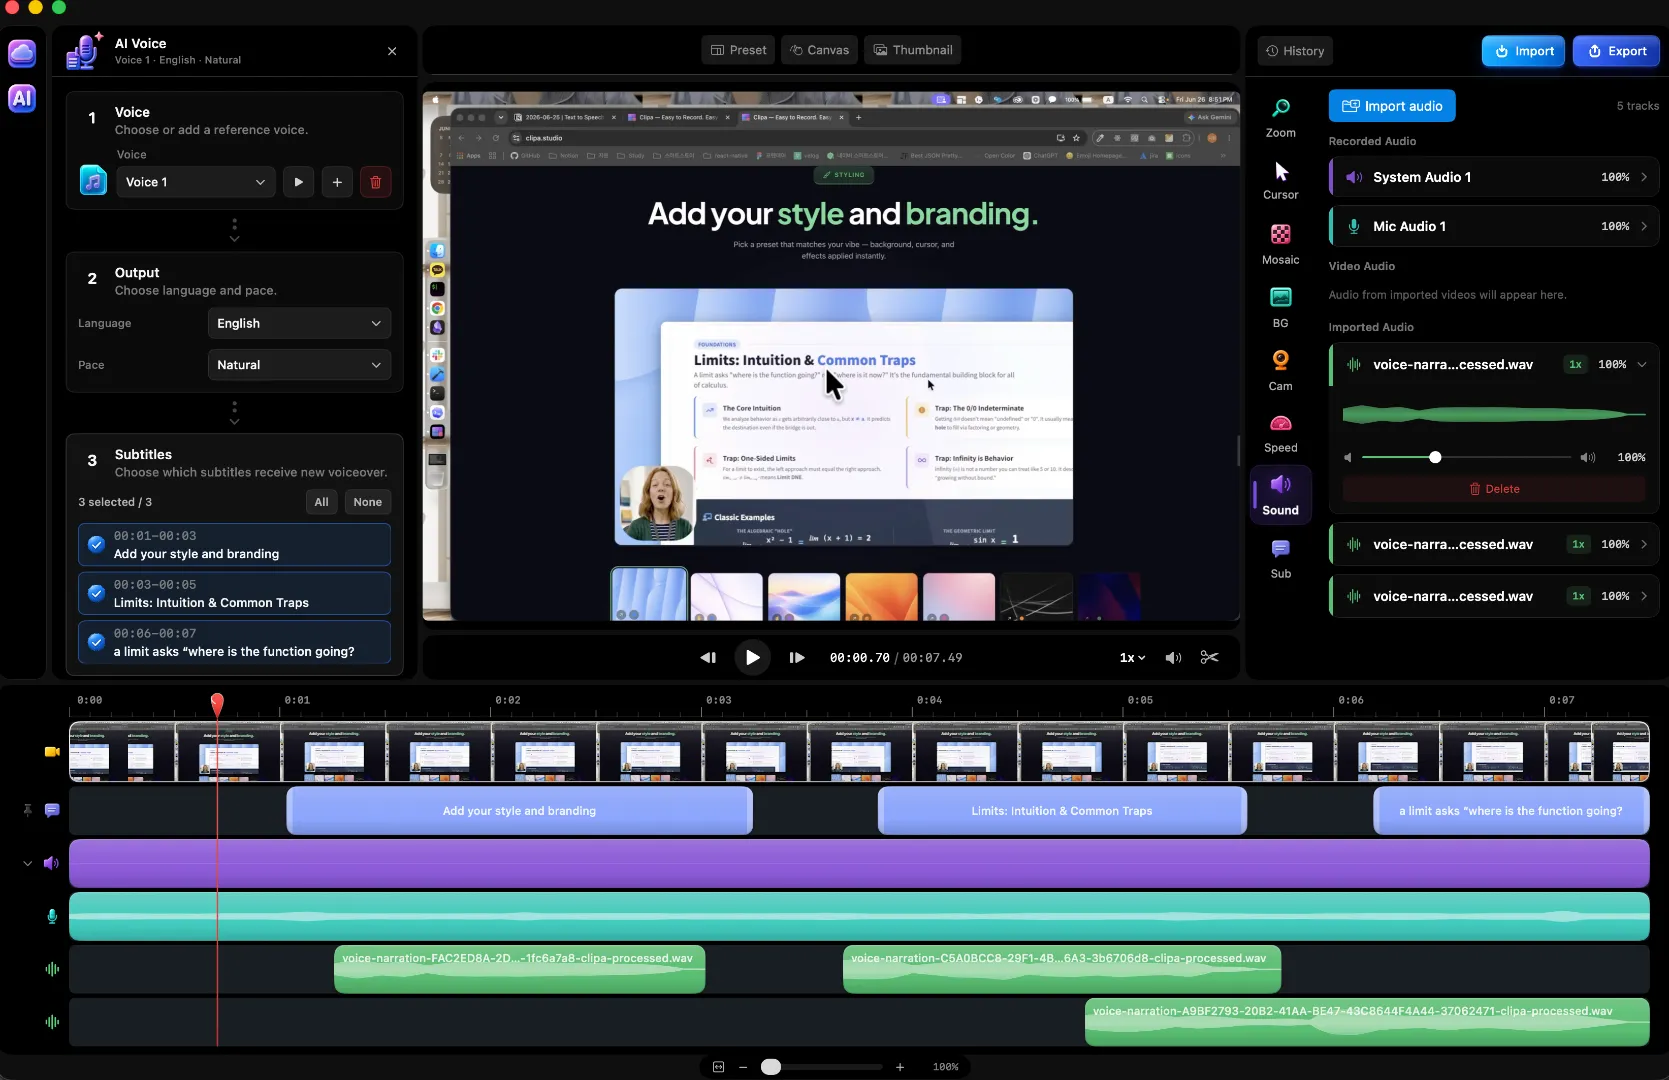
Before you export, run this quick check:
- The first spoken line starts after the viewer can see the relevant screen.
- Each voice segment ends before the next visual idea begins.
- The generated voice is not fighting system audio or background music.
- Subtitles still match the spoken meaning.
- The ending does not cut off the last word.
- The exported file plays correctly before you share it.
When text to speech improves a screen recording
Text to speech for video is most useful when repeatability matters. A product launch video may need a cleaner narration pass after the UI changes. A course lesson may need a consistent tone across many clips. A bug report may need a quick voice explanation without recording a meeting-style narration take.
It is less useful when personality is the whole point. If the video depends on your live reaction, humor, or face-to-camera delivery, record your own voice. You can still use generated voiceover for small corrective lines or translated variants, but the main performance should fit the video.
For most Mac screen recordings, a practical workflow is enough. Write clear subtitle segments. Generate voiceover for the parts that need narration. Review the audio beside the screen. Export only when the voice and visuals feel synchronized.