An OBS alternative for Mac screen recording should reduce setup without flattening your workflow into a raw capture.
OBS Studio is powerful software. Its official feature set centers on real-time video and audio capture, scene building, multiple sources, custom transitions, and detailed audio mixing (OBS Studio). That makes it a serious tool for streaming, complex source layouts, and technical productions.
The same strength can become friction when your goal is simpler. A product demo, tutorial, customer support walkthrough, or bug report often needs a clean capture, a few visual edits, readable cursor movement, balanced audio, and an export that is ready to send. If that is your job, an OBS alternative for Mac screen recording should be judged by workflow fit rather than raw feature count.
This guide compares OBS, QuickTime Player, and Clipa for Mac users who care about finished screen videos. It focuses on recording and post-recording polish rather than live streaming.
Why people search for an OBS alternative for Mac screen recording
Most people do not leave OBS because it is weak. They look for an alternative because OBS asks them to think like a producer before they have a clip.
OBS is built around scenes and sources. The official OBS overview describes scenes and sources as the place where users add layouts, games, webcams, devices, and other media for output (OBS overview guide). That model is flexible. It is also a setup model.
For a creator recording a repeatable YouTube setup, that tradeoff can be worth it. For a founder recording a short feature demo, it may be too much. The recording is not the final deliverable. It still needs trimming, zoom emphasis, audio cleanup, and export settings that match where the video will be used.
A good Mac alternative should make those jobs feel connected. The capture step should lead naturally into editing. The editor should understand screen-recording details such as cursor visibility, webcam overlays, background framing, system audio, and export format. The result should be a video you can publish or share without rebuilding the workflow in another app.
What an OBS alternative for Mac screen recording should solve
A useful OBS alternative does not need to copy OBS. It should solve a different job.
First, it should reduce capture setup. Mac screen videos often start from a simple choice: record a display, window, or selected area. Apple also exposes screen recording through QuickTime Player and the Screenshot tools, where users can start a screen recording from the app menu or the system capture controls (Apple QuickTime screen recording guide). That baseline matters because many Mac users expect recording to feel direct.
Second, it should handle permissions clearly. macOS controls access to screen and system audio recording in Privacy & Security settings (Apple screen and system audio permissions). A Mac-focused recorder should make that flow understandable instead of burying it behind generic capture errors.
Third, it should help after the recording stops. Raw screen recordings often need pacing and focus. Viewers need to see the click target, follow the cursor, understand the spoken explanation, and get a file that plays well in a browser or social feed.
Finally, it should respect the Mac platform. Apple's ScreenCaptureKit exists for high-performance capture of screen and audio content in Mac apps (Apple ScreenCaptureKit documentation). A native Mac workflow can build around those platform expectations instead of treating macOS as one target among many.
Compare OBS, QuickTime, and Clipa for Mac screen videos
| Tool | Strong fit | Tradeoff |
|---|---|---|
| OBS Studio | Streaming, complex layouts, scene switching, detailed audio routing | More setup before recording, and separate editing is often needed |
| QuickTime Player | Quick raw screen capture already available on Mac | Limited post-recording polish for tutorials, demos, and social-ready clips |
| Clipa | Record, edit, zoom, polish, and export in one Mac-focused workflow | Built for screen videos, not live streaming or every broadcast setup |
This is not a winner-takes-all comparison. OBS is the right tool when the recording is part of a live or studio-style production. QuickTime is enough when the viewer only needs a raw capture. Clipa fits when the recording is meant to become a polished screen video.
That distinction is important for trust. If you need live streaming, advanced scene automation, or a large plugin ecosystem, OBS is still a strong choice. If you want to record a Mac screen and quickly turn it into a clear product video, Clipa is designed for that narrower job.
When OBS is still the right tool
OBS remains a strong option when your output depends on live production control. If you switch between cameras, browser sources, game capture, overlays, and multiple audio sources during a session, the scene model is useful. OBS gives you a control room.
It also makes sense when your team already has an OBS workflow. A saved scene collection can be valuable. A technical user can tune audio filters, arrange sources, and keep a repeatable production setup.
The cost is mental overhead. You need to decide what belongs in a scene before you start. You may also need another app to trim mistakes, zoom into an important click, add background treatment, or export a version tailored to a platform.
For many screen-recording jobs, that split is the main reason to consider an alternative. The problem is not OBS quality. The problem is that the editing need arrives immediately after capture.
When QuickTime is enough
QuickTime Player is the simplest baseline on a Mac. Apple documents the screen recording flow directly inside QuickTime Player, which opens the Screenshot tools for recording the whole screen or a selected area (Apple QuickTime screen recording guide).
Use QuickTime when the video is disposable or purely informational. A quick internal bug reproduction can be enough as a raw recording. A short support clip may not need visual polish.
QuickTime becomes limiting when the recording needs to teach, sell, or publish. Raw cursor movement can be hard to follow. Silent pauses feel longer than they are. The viewer may need a close-up on a button, a cleaner webcam layout, better audio balance, or a specific export format.
That is the gap Clipa is meant to fill. It keeps the recording workflow direct while adding the edit tools screen videos usually need.
Where Clipa fits as a Mac screen recording alternative
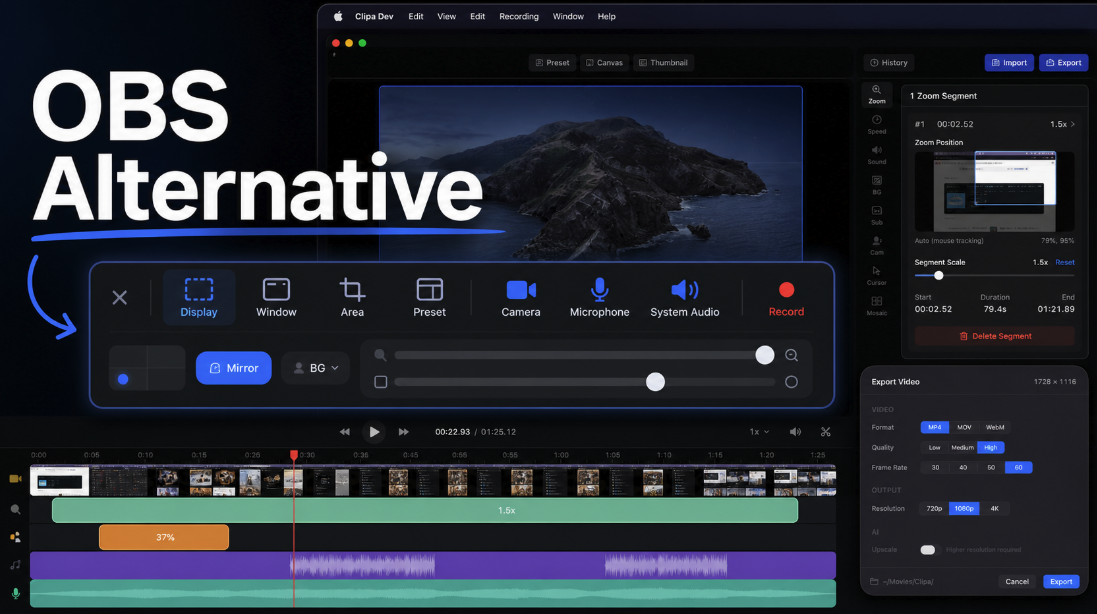
Clipa is a macOS-only screen recorder and editor. The product is built around recording a Mac screen, then improving the clip inside the same app. That matters because many screen videos fail after capture, not during capture.
For a product demo, the viewer needs to follow the feature path. Cursor zoom and click-focused emphasis help the eye stay with the action. For a tutorial, the editor needs to remove dead time and keep the pace steady. For a bug report, the recording needs enough context to reproduce the issue without forcing the viewer through unrelated steps.
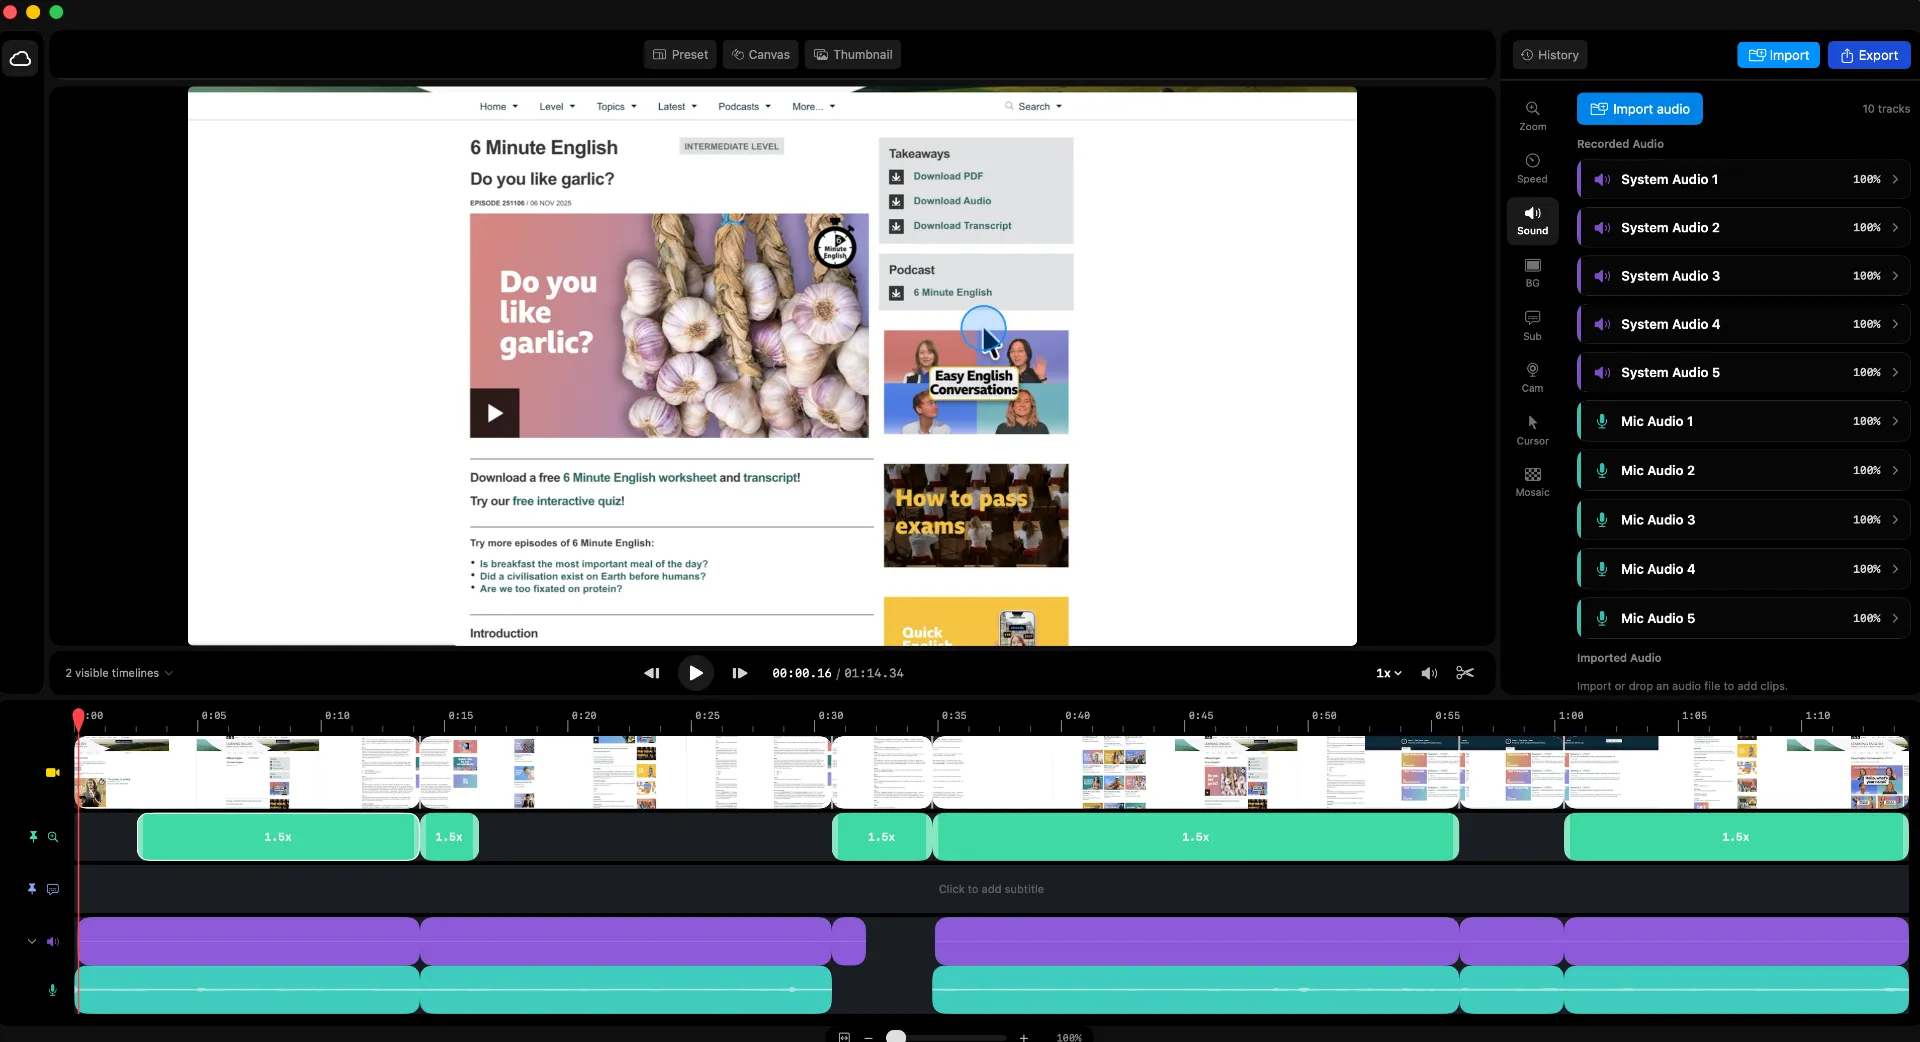
Clipa's workflow is intentionally narrower than OBS. It focuses on display, window, or area capture. It supports camera, microphone, and system audio choices from the recording panel. After capture, the editor can handle timeline polish, zoom emphasis, audio work, visual background treatment, mosaic or blur for sensitive information, speed changes, and export settings.
That does not make Clipa a broadcast studio. It makes Clipa a more direct fit for Mac users who record screen videos as finished assets.
A practical workflow in Clipa
Start with the final viewer in mind. A support engineer, course student, product lead, and YouTube viewer all need different pacing. Decide what the viewer should understand by the end of the video.
Open the recording panel and choose the capture scope. Display capture is useful when the full desktop context matters. Window capture keeps the video focused on one app. Area capture works well when you want a tight frame around a product surface.
Choose camera, microphone, and system audio based on the message. A product walkthrough may need voice and system audio. A bug report may only need system audio and cursor movement. A course clip may need webcam presence so the lesson feels guided.
Record the task once without trying to be perfect. If you stumble, pause and repeat the action cleanly. A screen-recording editor is most useful when it lets you keep the good parts instead of restarting from zero.
In the editor, trim the lead-in and ending first. Then watch for moments where the cursor travels across a dense interface. Add zoom emphasis where the viewer needs help. Keep zooms purposeful. Too many movement effects can make a practical video feel restless.
Next, check audio. If the voice is the guide, make sure it remains clear over system sound. If the system sound is the evidence, avoid hiding it under music or narration.
Use mosaic or blur when the recording includes private data. Redaction should happen before export, not after the video has already been shared.
Export for the destination. A product demo for a website, a tutorial for YouTube, and a short support clip may need different file choices. Clipa's export flow keeps that decision connected to the project instead of sending the recording to another editor.
Migration checklist from OBS to Clipa
If you are moving a recording-only workflow away from OBS, start with the jobs you repeat most.
List the scenes you use only for screen recording. If a scene is just display capture plus microphone, it may be a better fit for Clipa's recording panel. If a scene depends on overlays and live switching, keep that workflow in OBS.
Review your editing steps. If every OBS recording goes into another editor for trimming, zooming, audio balancing, or export cleanup, the real workflow is already multi-app. Clipa can reduce that handoff for Mac screen videos.
Check your audio needs. Confirm whether each video needs microphone, system audio, or both. macOS permissions can affect screen and system audio capture, so verify access before a time-sensitive recording (Apple screen and system audio permissions).
Define the final destination before recording. A video for a bug report should prioritize clarity and context. A video for a landing page should prioritize pacing, framing, and polish. A tutorial should prioritize readability and repeatable steps.
Keep OBS for what it does well. Use Clipa where the work is not live production but a finished Mac screen video.
Bottom line
The right OBS alternative for Mac screen recording depends on the job. OBS is built for control. QuickTime is built for basic capture. Clipa is built for the middle path many Mac creators actually need: record the screen, polish the result, and export a clearer video without turning the task into a production system.
If your next screen recording needs to become a product demo, tutorial, course clip, or support walkthrough, try the Mac-native workflow at https://www.clipa.studio.