Compress screen recording on Mac without making the UI blurry. Start with the export settings that control size, clarity, and shareability.
Large screen recordings usually come from a good instinct. You record at a high resolution because the product, code editor, course slide, or bug report needs to be readable. Then the file is too heavy for Slack, email, an issue tracker, or a quick review link.
The fix is not to crush the video until it looks soft. The fix is to remove wasted footage, choose a format that matches the destination, and export at the smallest settings that still protect the viewer's job.
This guide walks through a practical Mac workflow. It covers QuickTime and iMovie basics, then shows where Clipa gives you more control because recording, timeline cleanup, visual emphasis, export, and sharing live in one native workflow.
Why Mac screen recordings get large
A screen recording file grows when four things stack up: duration, resolution, frame rate, and compression quality. A long recording at a large canvas with high motion needs more data. A shorter recording of a mostly static app screen can often be much smaller without losing useful detail.
Before changing settings, inspect the source file. Apple notes that QuickTime Player's Movie Inspector can show details such as compression format, size, frame rate, data size, and data rate: View information about a media file in QuickTime Player on Mac. That tells you whether the file is large because it is long, high-resolution, high-frame-rate, or simply exported too generously for the destination.
Apple also explains that QuickTime's export menu offers resolutions based on the source movie, and that the exact resolution and data rate depend on the original file: Export movies in QuickTime Player. That detail matters. Compression is not one universal button. It is a series of tradeoffs.
For screen video, the most important tradeoff is text clarity. A face-camera vlog can tolerate more softness than a code walkthrough, Figma review, or app demo. If the viewer must read menus, cursor movement, labels, terminal output, or error text, keep enough resolution and bitrate for those details.
How to compress screen recording on Mac safely
Start with the least destructive steps first. You can always export a smaller version later, but you cannot recover clarity from an over-compressed final file.
1. Duplicate the original recording
Keep the source file untouched. Save a copy for compression work, especially if the recording is a launch demo, paid course lesson, client walkthrough, or bug report you may need to revisit.
This also gives you a clean fallback if a low-quality export looks muddy after upload. Platforms and messaging apps may recompress your file again, so the first export should not already be at the edge of readability.
2. Cut dead time before changing quality
Duration is the easiest file-size lever because it removes data without harming the remaining image. Trim the countdown, repeated setup, login wait, blank desktop, failed take, or long pause before you touch resolution.
In Clipa, trim the timeline first. Remove idle sections, tighten the start, and cut the ending after the final useful action. If a repetitive process needs to stay visible, use speed changes for the boring middle instead of keeping every second at normal pace.
This is where a dedicated screen recording editor helps. QuickTime can trim and split. Clipa is better when the same video also needs zoom emphasis, cursor clarity, audio cleanup, and export decisions in one pass.
3. Choose the export format for the destination
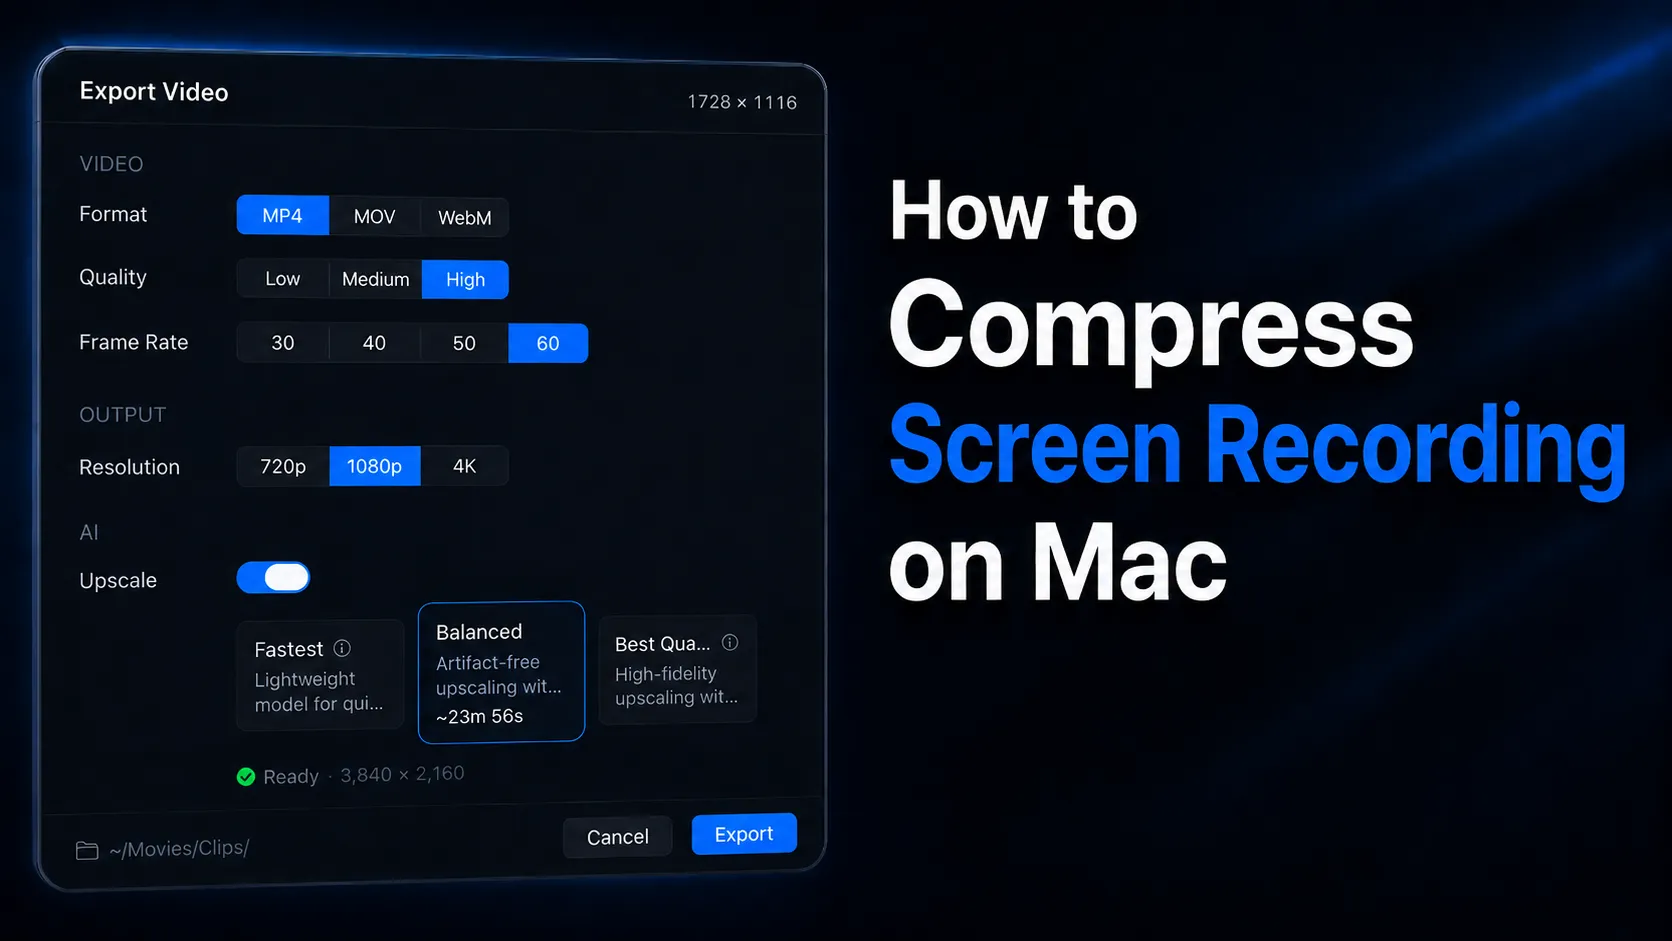
For most sharing, MP4 is the safest choice. Apple says iMovie can export MP4 when a video needs to work with devices, apps, or websites that do not support MOV: Share or export your iMovie video. MOV can be useful for Apple-native workflows or further editing. WebM can be useful for web delivery when your publishing stack supports it.
Clipa's public product page lists MP4, MOV, and WebM export from 720p to 4K: Clipa Studio. That range lets you choose the container and resolution based on the audience instead of sending the largest default every time.
Use this simple rule: pick MP4 when the viewer just needs to watch the video, MOV when the file is still part of an editing workflow, and WebM when the final destination is a web surface that expects it.
4. Lower resolution only as far as the screen content allows
Resolution controls how many pixels the viewer gets. Lower resolution usually means a smaller file, but it also makes UI text easier to blur.
Apple's iMovie guidance says 1080p is a good choice for most social media sites, while lower resolutions such as 720p can create smaller files that upload faster when internet speed is an issue: Share or export your iMovie video. That is a useful starting point for screen recordings too.
Use 1080p for tutorials, product demos, and app walkthroughs where text matters. Use 720p for quick internal reviews, low-stakes approvals, or a short bug report where the visible action matters more than fine text. Keep 4K for sharp product launches, course material, or recordings where the viewer may zoom in later.
5. Reduce quality one step, then review the hard parts
Quality settings control how aggressively the video is compressed. Lower quality can save space, but it can also create fuzzy text, banding in gradients, noisy cursor trails, or smeared motion.
Do not judge the export from the first frame. Scrub to the moments that are hardest to compress. Check fast cursor movement, scrolling, zoom transitions, camera overlay edges, subtitles, and any dense text. If those moments survive, the export is usually safe.
In Clipa, start by exporting one small test range. Review it at the same size your viewer will use. A video that looks fine in a tiny preview may fail when opened full-screen on a monitor.
6. Lower frame rate only when motion is not the point
Frame rate matters most when motion needs to feel smooth. A design walkthrough with slow cursor movement can often tolerate a lower frame rate than a fast animation demo or game capture.
For screen recordings, do not treat frame rate as a file-size shortcut by default. If the video teaches a sequence of clicks, menus, or static states, a lower frame rate may be fine. If the video shows motion design, scrolling behavior, or animation timing, protect smoothness.
7. Export, inspect, and compare
After export, check the new file with QuickTime's Movie Inspector. Confirm the resolution, format, file size, and visual quality. Then compare the original and compressed version side by side.
The right compressed file is not always the smallest one. It is the smallest file that still lets the viewer complete the job: understand the bug, follow the tutorial, approve the product flow, or watch the demo without asking for a clearer version.
QuickTime, iMovie, online compressors, or Clipa?
QuickTime is useful for a fast export when you only need a simpler version of an existing recording. It is already on the Mac, and it gives you basic export choices. It is not built for a full screen-recording editing workflow.
iMovie gives more export options than QuickTime and can export MP4. It can also reduce resolution and quality. That makes it a reasonable free option if the video is already finished and you only need another output.
Online compressors are convenient, but they require upload. That can be a poor fit for unreleased product screens, customer data, internal dashboards, source code, or private course material. If the recording is sensitive, keep the workflow local unless you have a clear reason to upload it.
Clipa is the better fit when compression is part of the recording workflow, not a separate cleanup step. You can record the right area, trim the timeline, emphasize the cursor with zoom, adjust pacing, and export in the format and resolution the destination needs. Clipa's site also states that recording, editing, and exporting happen on your Mac by default, unless you choose sharing or cloud storage: Clipa Studio.
That local-first workflow is useful for software teams, educators, and creators who need smaller files but still care about screen clarity.
A Clipa workflow for smaller screen recordings
The best compression starts before export. If you record less noise, the final file is easier to shrink.
First, capture only what matters. Use a window or custom area instead of the full display when the viewer does not need the whole desktop. This reduces visual clutter and helps the audience focus. It also means you may not need a huge final canvas just to make the important region readable.
Second, use zoom and cursor emphasis to protect comprehension. If the important click or menu item is visually emphasized, the viewer can follow the action even when the final export is smaller. This is especially useful for software tutorials, bug reports, and feature demos.
Third, clean the timeline. Cut false starts, shorten waits, remove duplicate explanation, and speed through mechanical pauses. This improves file size and pacing at the same time.
Fourth, export for the destination. In Clipa's export panel, choose MP4 for broad sharing, set a practical resolution, and lower quality only after checking text readability. Use MOV when the file needs to stay in an editing pipeline. Use WebM when your web target benefits from it.
Fifth, share the right deliverable. If the viewer only needs to watch and comment, a smaller exported MP4 or a share link is often better than sending the master file. If the viewer needs to re-edit the video, keep a higher-quality copy for handoff.
Recommended export choices by use case
For a bug report, keep the recording short and readable. Capture the smallest area that shows the issue, trim the setup, and export MP4. Use a lower resolution only if the error text and cursor path remain clear.
For a product demo, protect polish. Use clean framing, cursor zoom, and a resolution that keeps labels sharp. Compress by cutting dead time and choosing a practical quality setting before sacrificing readability.
For an online course or tutorial, treat clarity as the main requirement. Students may pause, replay, and watch full-screen. Use compression carefully. A slightly larger file is better than a lesson where menus and code are hard to read.
For social video, start from the target platform. Clipa includes platform-oriented export presets on its public product page, including YouTube, TikTok, and Instagram. Use those presets when the format and aspect ratio matter more than a generic desktop export.
For internal review, optimize for speed. A shorter 720p or 1080p MP4 can be enough when the viewer only needs to approve flow, copy, or interaction. Keep the original project available in case the review turns into a publishable asset.
Mistakes that make compressed recordings look bad
The first mistake is compressing before trimming. If a recording has two minutes of dead air, no codec setting will fix the wasted duration as cleanly as cutting it.
The second mistake is downscaling text-heavy screens too far. Screen recordings are different from camera footage. Text, icons, panels, and cursor motion expose compression artifacts quickly.
The third mistake is judging quality before upload. Some platforms recompress video after upload. If the first export already looks borderline, the published version may look worse.
The fourth mistake is using an online compressor for private work. Uploading may be acceptable for a public marketing clip. It is a bad default for customer dashboards, unreleased features, internal docs, code, or support tickets.
The fifth mistake is changing every setting at once. Change one lever, export a short test, and compare. Start with duration, then resolution, then quality, then frame rate.
When a larger export is the right choice
Compression is not the goal. Communication is the goal.
Keep a larger export when the video is a launch asset, a paid lesson, a customer-facing walkthrough, or a tutorial with dense UI. Keep a larger export when the viewer needs to zoom in. Keep a larger export when the file will be edited again.
You can still make the delivery easier. Export a lighter review copy for comments, but keep a high-quality master for publishing or future edits.
Clipa fits this split workflow well. Record and edit once. Export a compact copy for review. Keep the project or a higher-quality export for final delivery.
Bottom line
To compress screen recording on Mac, do not start by crushing quality. Start by cutting what the viewer does not need. Then choose MP4, set the right resolution, lower quality carefully, and review the moments where UI text and cursor movement matter most.
QuickTime and iMovie can help with simple exports. Clipa is built for the full path: record the right screen area, polish the timeline, guide attention with zoom, export in a practical format, and share the result without juggling separate tools.
Try Clipa at https://www.clipa.studio and turn your next Mac screen recording into a smaller, clearer video that is ready to send.