
Screen recording audio out of sync on Mac can come from capture settings, dropped frames, or audio routing drift. Here is a clean fix path.
Why screen recording audio out of sync on Mac happens
Audio sync problems usually show up in one of three ways. The audio starts early or late from the first second. The recording begins in sync but drifts farther away as it plays. Or the preview looks fine, then the exported file sounds wrong.
Those symptoms have different causes. A fixed offset often points to a capture setup issue. A growing drift points to frame drops, unstable source playback, or audio clock mismatch. An export-only mismatch points to an editing or rendering step.
On modern macOS, screen recording is not just a movie of pixels. Capture apps receive video frames and audio samples with timing metadata. Apple’s ScreenCaptureKit documentation describes screen and audio capture as streams of media sample buffers. Apple’s AVFoundation is the framework layer many Mac media apps use to inspect, edit, mix, and write audiovisual media.
That timing chain matters. If the source app stutters, the recorder is overloaded, the wrong audio route is selected, or an imported file has unusual timing, the final movie can feel a little disconnected from the narration or system sound.
The practical goal is simple. First, decide whether the problem happened during capture, edit, or export. Then fix the earliest step you can still control.
Do a quick sync diagnosis before editing
Start by playing the original file in QuickTime Player or another reliable local player. Do this before you import the recording into an editor. If the original is already out of sync, the issue happened during capture or source playback. If the original is fine but the edited export is not, the issue is probably in the edit or export settings.
Next, check the pattern. Clap once, click a button, or use a visible UI event with sound near the start of a test recording. If the click is offset by the same amount throughout the file, you can usually fix it by shifting an audio segment. If the offset grows as the file plays, shifting the whole track will only fix one point. You need to look for dropped frames, unstable source playback, or speed changes.
Also isolate the audio source. Microphone narration, system audio, camera audio, and imported music can fail in different ways. A Mac can have several input and output devices active at once. Bluetooth devices, virtual audio drivers, browser audio, external webcams, and meeting apps can each add delay.
Fix permissions and audio source problems first
Before you blame the editor, check macOS permissions. Apple’s support guide for Screen & System Audio Recording explains that apps and websites need permission before they can record your screen and audio. Open System Settings, then Privacy & Security, then Screen & System Audio Recording. Make sure your recorder is allowed.
If you are using Apple’s built-in recording controls, Apple’s guide to recording the screen on Mac notes that microphone selection is part of the recording setup. That matters because a silent or wrong microphone can be mistaken for a sync problem.
For third-party tools, confirm three things before recording again. Select the microphone you expect. Select system audio only if the app supports it. Restart the recording app after changing privacy permissions, because capture permissions often need a relaunch before the app sees them.
In Clipa, keep the setup in one workflow when possible. Record the screen, microphone, system audio, and camera overlay in the same Mac app. This removes several handoff points that can create sync mistakes later.
Reduce capture load when drift appears during recording
If the recording starts in sync but drifts later, your Mac may be struggling to capture and encode cleanly while the source app is running. This is common when recording a browser demo, a video call, a large external display, and a camera feed at the same time.
Close heavy apps before a real take. Keep the browser tab count low. Avoid recording a streaming video while the stream itself is buffering. Save to local storage instead of a slow external path when possible. If the recording area can be smaller without hurting readability, capture only that area.
A native recorder can help because it works closer to the macOS media stack. Clipa is built for Mac screen recording and editing, so the capture and timeline workflow stay inside one desktop app. That does not mean every bad source file can be repaired. It does reduce the need to pass a recording through several tools before export.
If you use a virtual audio device, external interface, or a recorder-specific audio driver, check that tool’s audio settings before the take. Some recorder support guides, including TechSmith’s Camtasia troubleshooting for macOS, mention sample-rate settings as one possible cause in their own workflows. Treat that as a device- or app-specific check, not a universal Mac fix.
Fix an existing out-of-sync recording in Clipa
When you cannot re-record, open the file in Clipa and identify the first point where the mismatch is obvious. Use a visual action that has a clear sound. A mouse click, keyboard sound, menu pop, or spoken word that matches a slide change is easier to align than background music.
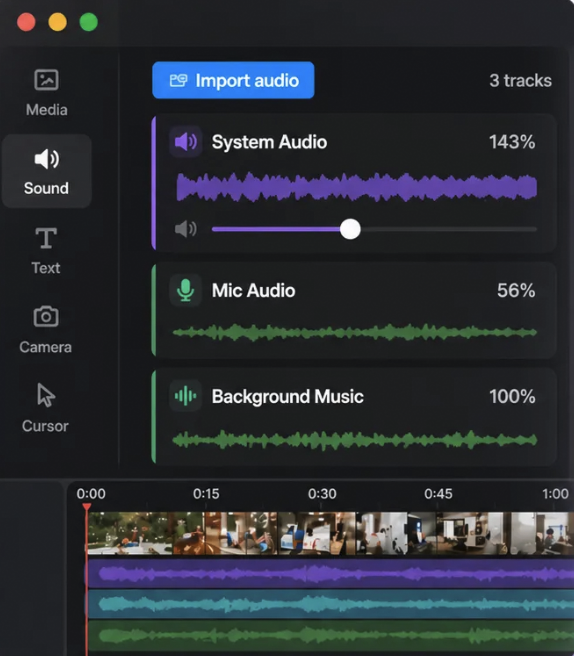
If the offset is constant, shift the relevant audio segment until the visible action and waveform line up. Clipa supports imported audio, timeline positioning, waveform-based alignment, volume and mute controls, and splitting or trimming audio sections. That gives you a practical repair path for narration, system audio, and added music.
If the drift grows over time, split the work into smaller sections. Align the start of the first section. Move to the first point where the sync becomes distracting. Cut there, then realign the next section. This is slower than a single track shift, but it avoids overcorrecting the whole recording for one bad moment.
For recordings where speed edits caused the mismatch, keep video and audio timing together. In Clipa, change the relevant video clip speed, then preview the recorded system or microphone audio around that edit. If an imported audio track was added separately, check it against the same visual cue before export.
Video needed! [20-second MP4 showing a recorded clip with audio shifted into sync on the Clipa timeline, 16:9 landscape]
Prevent sync problems during cuts and exports
After the main repair, review the edit around every cut. Audio sync problems often hide at edit boundaries. A cut can feel correct in the middle of a section but wrong at the exact transition.
Use short playback passes instead of watching the whole video once. Check the beginning, the first major cut, any speed-changed section, any camera overlay section, and the final export. If a clip includes system audio and microphone narration, listen to both. If the system audio is correct but the microphone is late, fix the microphone segment rather than shifting every track.
Export with settings that match the destination. Clipa includes common export choices such as MP4, MOV, WebM, 720p, 1080p, 4K, and platform-friendly canvas presets. In practice, the fewer unnecessary conversions you add after export, the easier it is to preserve timing.
If the exported file is out of sync but the Clipa preview is not, export a short section around the problem first. This gives you a smaller test file. It also tells you whether the issue is tied to one edit, one imported asset, or the whole project.
When re-recording is the better fix
Some files are not worth rescuing. If the recording has missing audio, long frozen video sections, or a source stream that buffered during capture, editing can only hide part of the issue. Re-recording is often faster than trying to stretch and cut around broken timing.
Re-record with a simpler setup. Use a local app or local file as the source when you can. Restart the recorder after permission changes. Keep the capture area focused. Record a short test and check it before doing the full take.
This is also where Clipa’s product fit is strongest. A creator making a product demo, tutorial, course segment, or bug report can record and edit in the same Mac workflow. You can capture the screen, trim mistakes, add zoom emphasis, adjust audio placement, and export without moving the project into a heavy editor.
A clean Clipa workflow for synced Mac recordings
Use this workflow when audio sync matters:
- Set the Mac permissions and audio sources before recording.
- Record a short test with the same microphone, system audio, camera, and screen area.
- Play the raw test file and check one visible action against its sound.
- Record the real take only after the test is clean.
- In Clipa, trim the dead space and cut mistakes first.
- Align any imported or shifted audio segments before adding style edits.
- Apply zoom effects or speed changes, then preview those sections again.
- Export a short section if anything feels risky.
- Export the final video and check it in a local player.
This sequence keeps the diagnosis close to the source. It also keeps the edit practical. You are not guessing whether the problem came from macOS permissions, a browser recorder, a virtual audio route, or the final export.
Screen recording audio out of sync on Mac is fixable when you treat it as a timing problem instead of a mystery. Check capture permissions, simplify the recording load, align the right segment, and verify the export before you publish.
Try the native macOS 15+ workflow at https://www.clipa.studio when you want screen recording, timeline edits, zoom effects, audio cleanup, and export in one place.