
How to Record Professional-Looking Online Course Videos on Mac
The online learning market is growing faster than ever. From YouTube and Class101 to Inflearn and other learning platforms, anyone can now create and publish educational content.
But one question remains: how do you record online course videos that look professional and keep students engaged until the end?
A great online course is not only about the quality of the content. Clear visuals, crisp audio, smooth screen recording, and easy-to-follow explanations all play a major role in the learning experience.
In this guide, we’ll walk through the complete process of recording professional-looking online course videos on Mac, from setting up your environment to exporting your final video.
About This Guide
Written by the Clipa Team
The Clipa Team builds native macOS screen recording tools for educators, creators, and product teams. This guide is based on practical Mac lecture recording workflows, including microphone capture, system audio recording, cursor effects, zoom, segment editing, and export settings.
Recommended Recording Setup
For most online course videos on Mac, we recommend the following setup:
| Item | Recommendation |
|---|---|
| Resolution | 1920×1080, also known as 1080p |
| Frame rate | 60fps |
| Audio | USB microphone or headset microphone |
| Recording environment | Quiet room with minimal echo |
| Export format | MP4 or WebM |
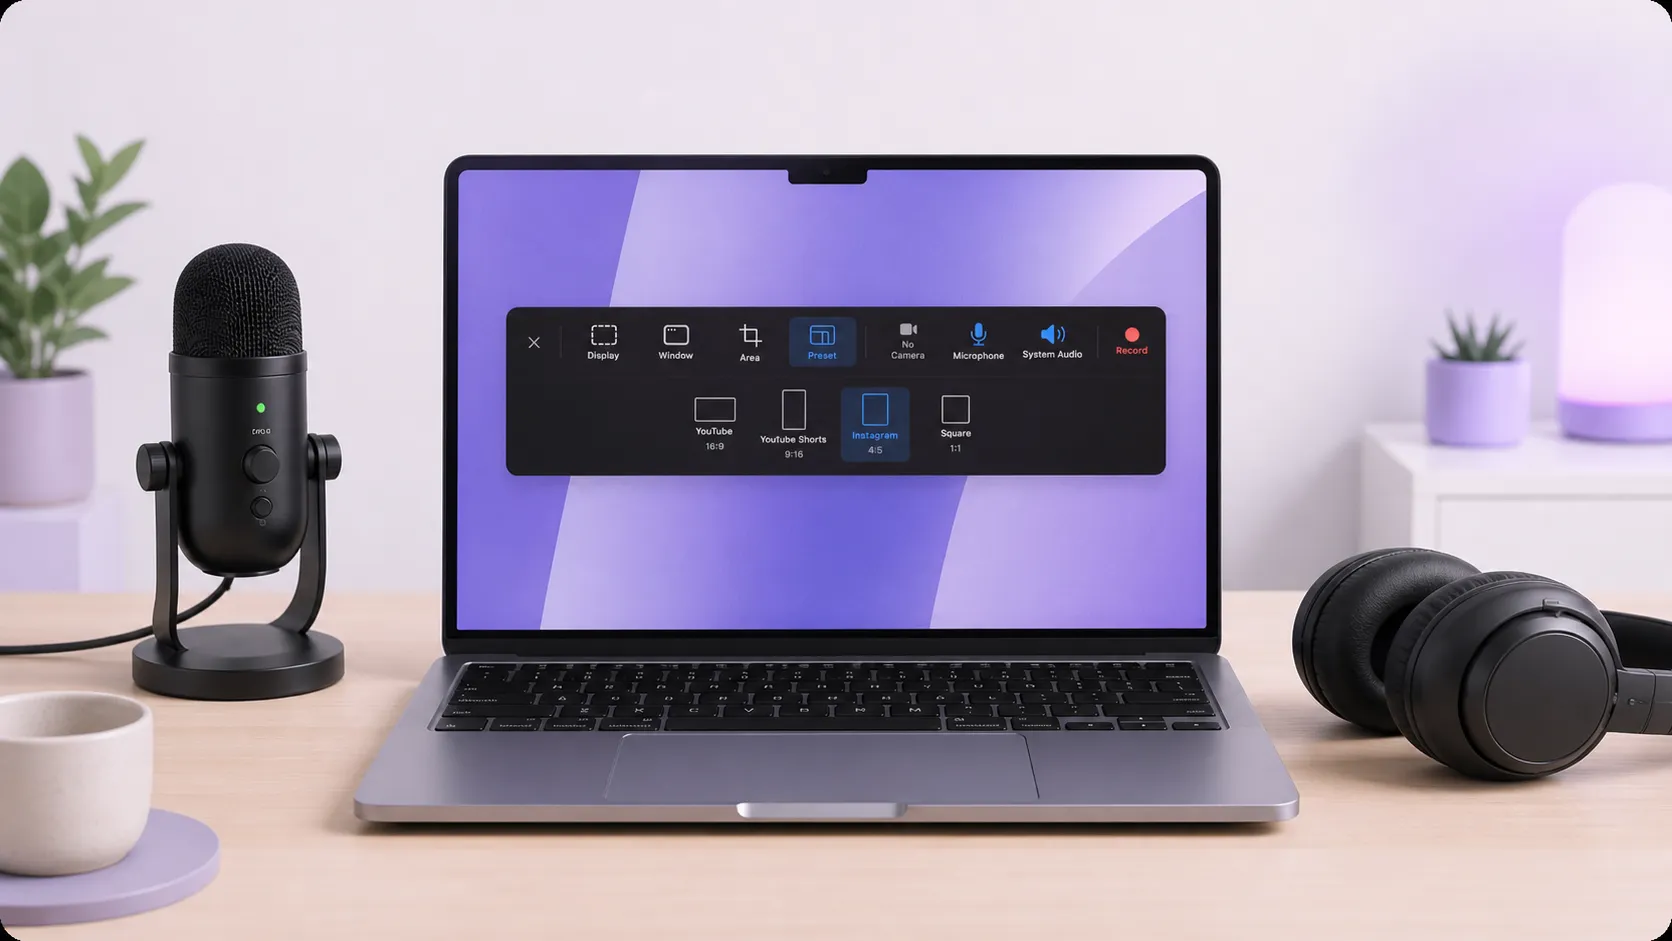
| Recording app | Clipa |
1. What to Prepare Before Recording an Online Course
Before you press the record button, take a few minutes to prepare your recording setup. Small improvements in your environment can make a big difference in the final video quality.
Set Up a Quiet Recording Environment
Audio quality is one of the first things students notice. Even if your lesson is valuable, background noise can make it difficult to focus.
Try to minimize:
- Air conditioner or fan noise
- Keyboard and mouse clicks
- Outdoor noise
- Echo from empty rooms
- Notifications from your Mac
A quiet room with soft materials such as curtains, rugs, or cushions can help reduce echo and make your voice sound warmer.
Check Your Screen Resolution
For most online lectures, 1080p resolution, or 1920×1080, is the standard.
Retina Macs support high-resolution displays, but you should still check your recording resolution before starting. If your screen recording is too small or blurry, students may struggle to read slides, code, menus, or interface details.
For lecture videos, 1080p is usually clear enough for most platforms and keeps the file size manageable.
Clean Up Your Desktop
Before recording, close unnecessary windows and remove distracting desktop icons.
A clean screen helps students focus on your explanation rather than unrelated files, browser tabs, or notifications. This is especially important for software tutorials, coding lessons, design walkthroughs, and presentation-based lectures.
2. Best Mac Recording Settings for Online Lectures

Choosing the right recording settings helps you create high-quality videos without producing unnecessarily large files.
Recommended Resolution and Frame Rate
For most online course videos, the recommended setting is:
1080p at 60fps
Online lectures usually do not involve fast motion, so 60 frames per second is more than enough for slides, screen tutorials, coding lessons, and educational presentations.
While 4K recording may sound attractive, it can create much larger files and make editing slower. Unless your course specifically requires ultra-high-resolution visuals, 1080p is usually the best balance between quality and performance.
Audio Settings for Mac Lecture Recording
By default, macOS does not make it easy to record internal system audio.
For slide-based lectures, microphone audio may be enough. But if you are recording software tutorials, product demos, app walkthroughs, or lessons that include sound from your Mac, you may need to capture both:
- Microphone audio
- System audio
Some creators use virtual audio drivers such as BlackHole to capture internal audio. Another option is to use a Mac screen recording app like Clipa, which supports system audio recording directly without complicated setup.
This makes it easier to record tutorials, walkthroughs, and online lessons with both your voice and your Mac’s audio included.
3. Three Tips to Make Your Course Videos Look More Professional
Once your basic setup is ready, the next step is to make your lecture easier to follow. These small production details can significantly improve the viewing experience and help your course videos feel more polished.
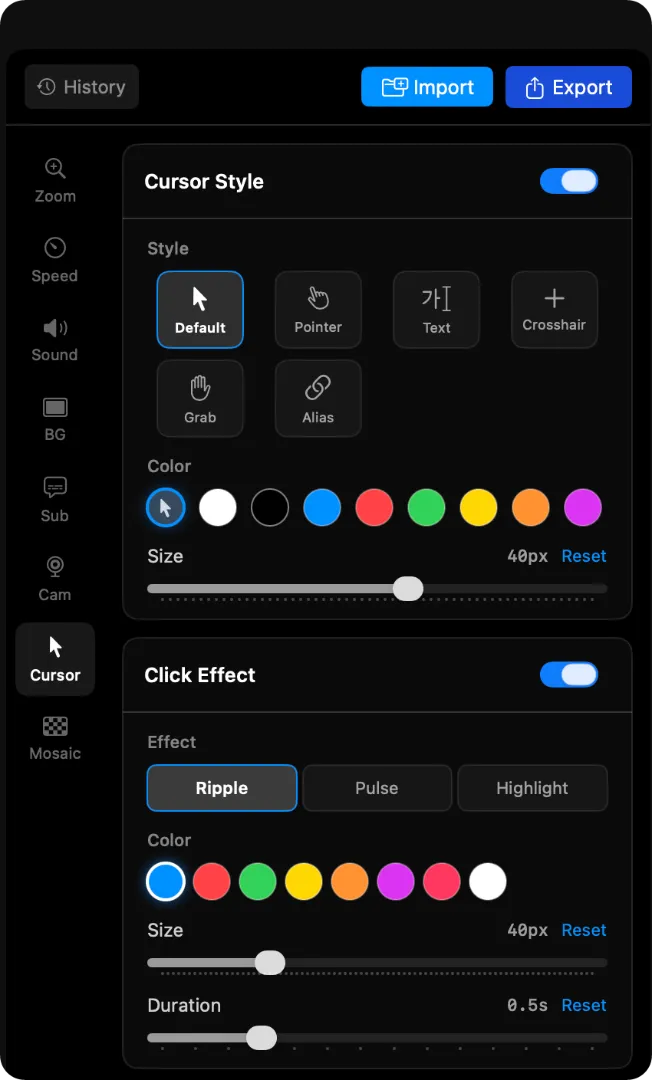
Tip 1: Use Cursor Highlight Effects
When students watch a screen recording, they need to understand exactly where you are clicking and what part of the screen you are explaining.
A small cursor can be difficult to follow, especially when viewers are watching on smaller screens.
Using cursor highlight effects makes your actions much clearer. Students can easily track your mouse movement, clicks, and important interface elements.
Clipa supports six cursor styles, allowing you to choose the look that best fits your lecture style. Whether you are explaining a software tool, walking through a website, or teaching a design workflow, cursor highlighting helps students follow along without confusion.
Tip 2: Add Zoom Effects to Important Areas
When explaining code, small menu items, toolbar buttons, or detailed interface elements, zoom effects can help students focus on the most important part of the screen.
Instead of asking students to look closely, you can guide their attention visually.
Automatic zoom effects are especially useful for:
- Coding tutorials
- Design tool walkthroughs
- Software training videos
- Product demos
- Slide presentations with small text
- Step-by-step technical lessons
With Clipa, you can use zoom effects to make key moments easier to understand without complex video editing. This helps your lecture feel more polished and professional.
Tip 3: Edit Out Mistakes with Segment Editing
Trying to record a perfect lecture in one take is stressful.
Instead of restarting every time you make a mistake, keep recording and fix the issue later during editing. This approach makes the recording process much faster and more natural.
With segment editing, you can remove:
- Long pauses
- Repeated explanations
- Coughs or background noise
- Mistaken clicks
- Unnecessary sections
- Failed attempts or repeated takes
Clipa allows precise audio and video segment editing, so you can quickly cut out unwanted parts and keep your lecture clean and easy to watch.
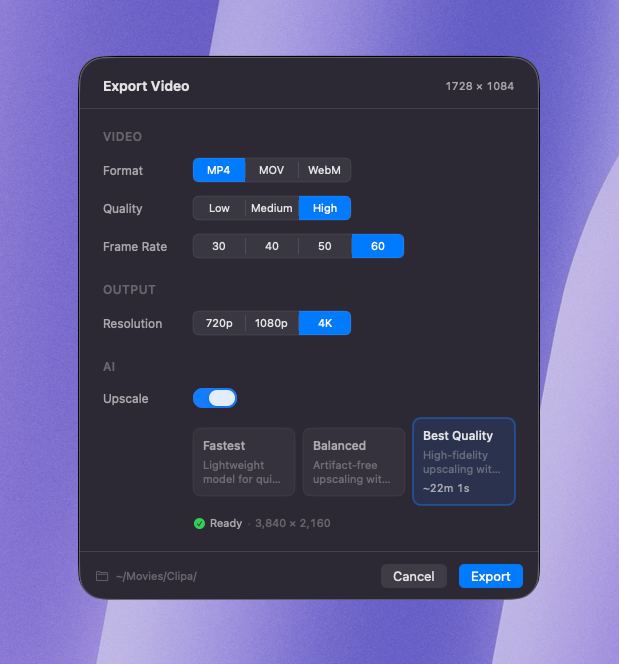
4. Best Video Formats for Online Course Platforms
After recording and editing your lecture, you need to export it in the right format for your platform.
Here are common format recommendations:
| Platform | Recommended Format |
|---|---|
| YouTube | MP4, H.264, 1080p |
| Class101 | MP4, H.264, 720p–1080p |
| Inflearn | MP4, 1080p |
| Zoom recording sharing | MP4 or WebM, 720p |
For most online courses, MP4 with H.264 is the safest and most widely supported option.
WebM can also be useful when you want smaller file sizes and fast web streaming. This can be helpful for web-based lessons, internal training materials, or lightweight video sharing.
Clipa supports both MP4 and WebM export, so you can choose the right format depending on where your course video will be uploaded.
5. Start Recording Online Courses on Mac with Clipa
Clipa is a native macOS screen recording app built for creators, educators, and professionals who want a simpler way to record polished videos.
Instead of using separate tools for recording, audio capture, editing, and exporting, Clipa brings the full workflow into one app.
With Clipa, you can:
- Record system audio and microphone audio together
- Highlight your cursor for clearer explanations
- Add zoom effects to guide student attention
- Edit recordings with precise segment-based editing
- Export videos as MP4 or WebM
- Create course videos without complex editing software
- Work in a clean, intuitive SwiftUI interface designed for macOS
If you only need to record a simple slide presentation with microphone audio, a basic screen recorder may be enough. But if your course includes system audio, cursor effects, zoom, editing, and multiple export formats, using a dedicated Mac recording app like Clipa can simplify the entire workflow.
Whether you are creating your first online course, recording a software tutorial, or preparing training videos for your team, Clipa helps you produce professional-looking lecture videos faster.
FAQ
What is the best resolution for recording online courses on Mac?
For most online courses, 1080p is the best choice. It provides clear visual quality while keeping file sizes reasonable and editing performance smooth.
Is 60fps enough for lecture videos?
Yes. Since most lecture videos involve slides, screen sharing, coding, or software demonstrations, 60fps is usually enough. Higher frame rates are generally unnecessary unless you are recording fast-moving content.
Can Mac record system audio by default?
macOS does not provide a simple built-in way to record internal system audio. You usually need a virtual audio driver or a screen recording app like Clipa that supports system audio capture.
Can I record both system audio and microphone audio on Mac?
Yes. You can record both system audio and microphone audio on Mac, but the setup depends on the tool you use. Clipa simplifies this workflow by supporting system audio and microphone recording together.
What format should I export online course videos in?
MP4 with H.264 is the most widely supported format for online course platforms. WebM can be useful when you want smaller files for web-based streaming.
Do I need expensive equipment to record online lectures?
No. A quiet space, a clear microphone, and reliable screen recording software are enough to get started. A USB microphone can improve audio quality, but you do not need a full studio setup.
Create Your First Professional-Looking Course Video with Clipa
Record, edit, and export professional-looking online course videos on Mac with Clipa.
With system audio recording, microphone capture, cursor highlights, zoom effects, segment editing, and MP4/WebM export, Clipa gives educators and creators a simpler way to produce polished lecture videos.
Start recording with Clipa today.