Product Demo Video on Mac: How to Make One
A product demo video on Mac should show the viewer exactly what changed, why it matters, and what to try next.
A raw screen recording can document a feature. A product demo has a harder job. It must guide attention, remove dead air, protect sensitive UI, and end with a clip you can use on a launch page, support article, sales email, or changelog.
Clipa is built for that Mac-first workflow. It records the screen, system audio, microphone, and camera overlay, then keeps the edit close to the capture. The result is a practical path from rough walkthrough to usable demo without moving the recording through a heavy editing stack.
Start with the product moment, not the recording button
A useful demo starts before capture. Pick the product moment you want the viewer to remember. That might be a new dashboard filter, a faster import flow, a billing setting, or a bug fix that removes friction.
Write the path as a short scene list. Start with the user problem, show the action, then show the result. Keep setup steps out of the main path unless they prove the value. If the viewer came for a product demo, they should not spend the opening watching you sign in, resize windows, or hunt through menus.
For SaaS teams, the scene list can be simple:
- Open the feature in a clean test workspace.
- Show the before state or blank state.
- Perform the action that creates the value.
- Pause on the result long enough for the viewer to understand it.
- End on a screen that supports the next step.
This planning step also protects trust. Remove private customer names, internal dashboards, unreleased roadmap notes, and distracting browser tabs. If the demo needs realistic data, use a staging workspace that was built for public recordings.
Set up a clean Mac capture
Apple documents that macOS can record the entire screen or a selected portion with Screenshot or QuickTime Player. Its screen recording guide also notes that some protected app windows may not allow recording. That matters for demos because the capture area should be deliberate. Record the smallest useful region instead of your full desktop when you can.
Clipa gives that setup a product-demo shape. Use full screen, window, custom area, or preset-format capture depending on where the demo will live. A website hero demo usually benefits from a stable window capture. A social clip may need a preset aspect ratio. A support walkthrough may need more desktop context.
Before recording, prepare the Mac like a viewer will inspect every pixel:
- Hide notifications and unrelated menu bar noise.
- Use a browser profile with demo-safe data.
- Increase app zoom if the UI has dense labels.
- Keep the cursor still when you are explaining a result.
- Choose microphone and system audio intentionally.
The goal is not to make the Mac disappear. The goal is to make the product path easy to follow.
Product demo video on Mac workflow
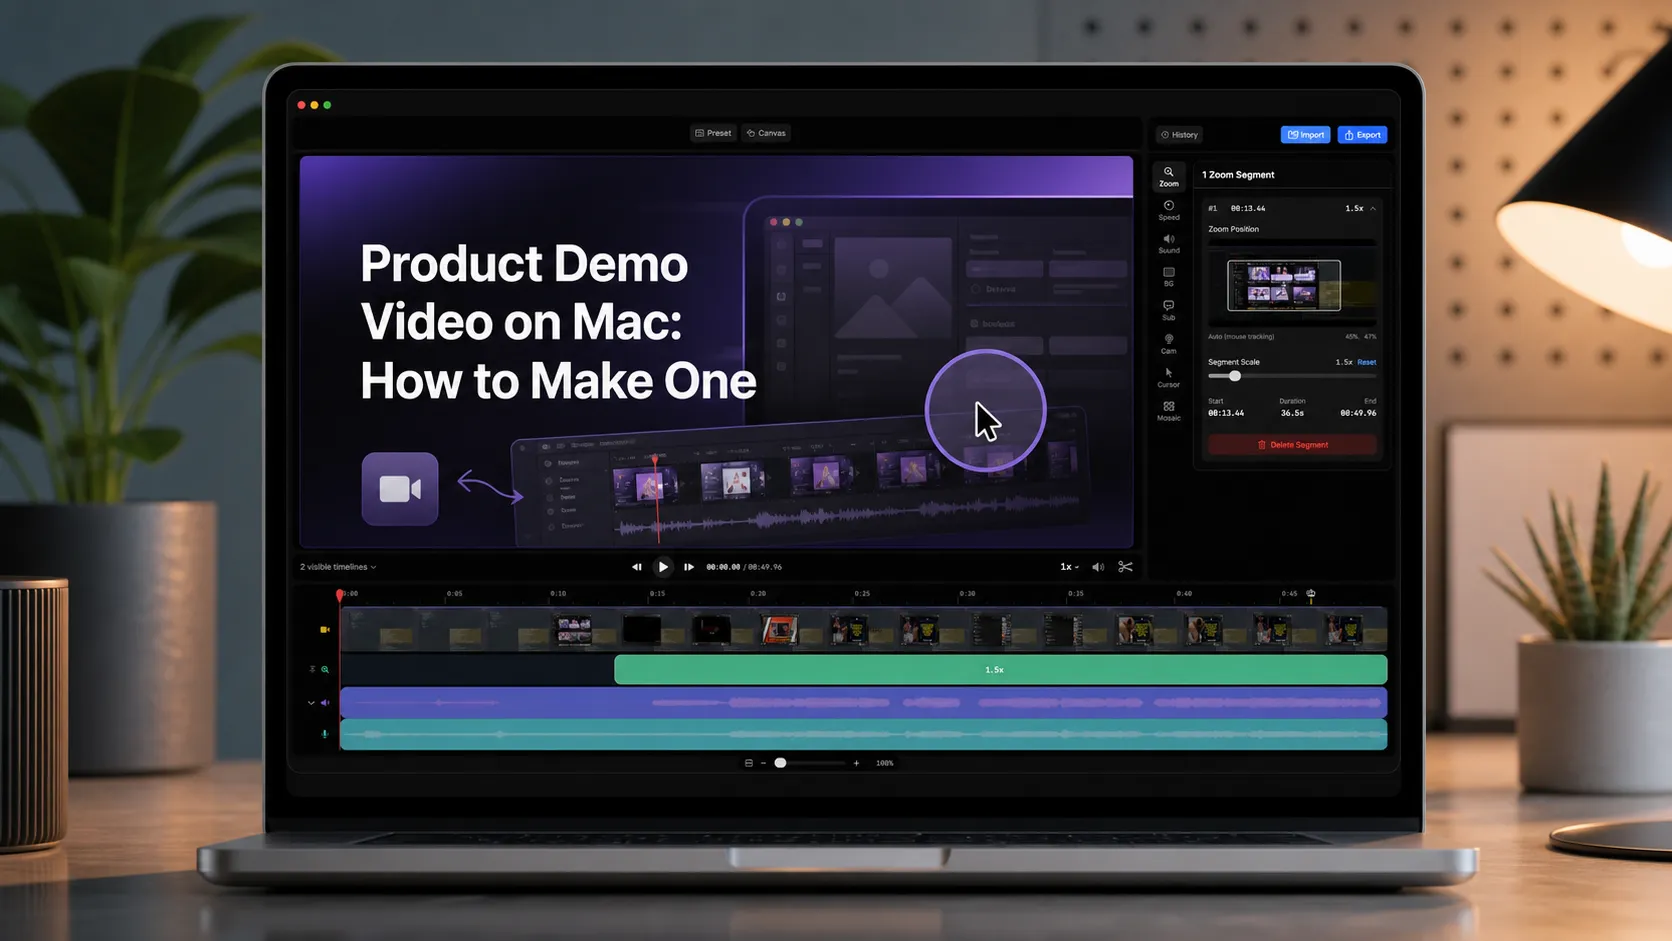
A product demo video on Mac works well when recording, editing, and export stay in the same mental model. Clipa records the walkthrough, then lets you cut, trim, split, adjust speed, add zoom emphasis, and export from the same project.
That matters because product demos often fail in small moments. You click one wrong tab. You talk over a loading state. You realize the cursor covered the button. You need to remove a pause without breaking audio. A dedicated workflow helps you fix those moments without starting from a blank timeline.
Use Clipa's click-based zoom for the actions the viewer must notice. A pricing toggle, command palette, nested menu, or small status badge may look obvious while you are recording. It can disappear once the clip is compressed for a web page. Zoom edits give that moment visual weight.
Recent Clipa releases also improved the editing path for demo work. Version 1.0.3 added cut-join and keyboard navigation in the editor, improved zoom timing accuracy in export, and made recording start and finish behavior more reliable. Those are not flashy checklist items. They matter because product demos need repeatable edits and predictable output.
Use voice, camera, and system audio with restraint
A product demo can work without narration when the UI path is self-explanatory. It can also work with voice when the feature needs context, positioning, or a short explanation of why the result matters. Choose the format that helps the viewer decide faster.
Use microphone audio when the viewer needs reasoning. Keep the script close to what is happening on screen. Avoid reading a full feature announcement over a simple click path. If the screen already explains the action, let the recording breathe.
Use system audio when the product experience includes sound, confirmation tones, media playback, or another audio cue that proves the workflow. Otherwise, keep the system track clean. Silence is often easier to understand than a desktop full of stray alerts.
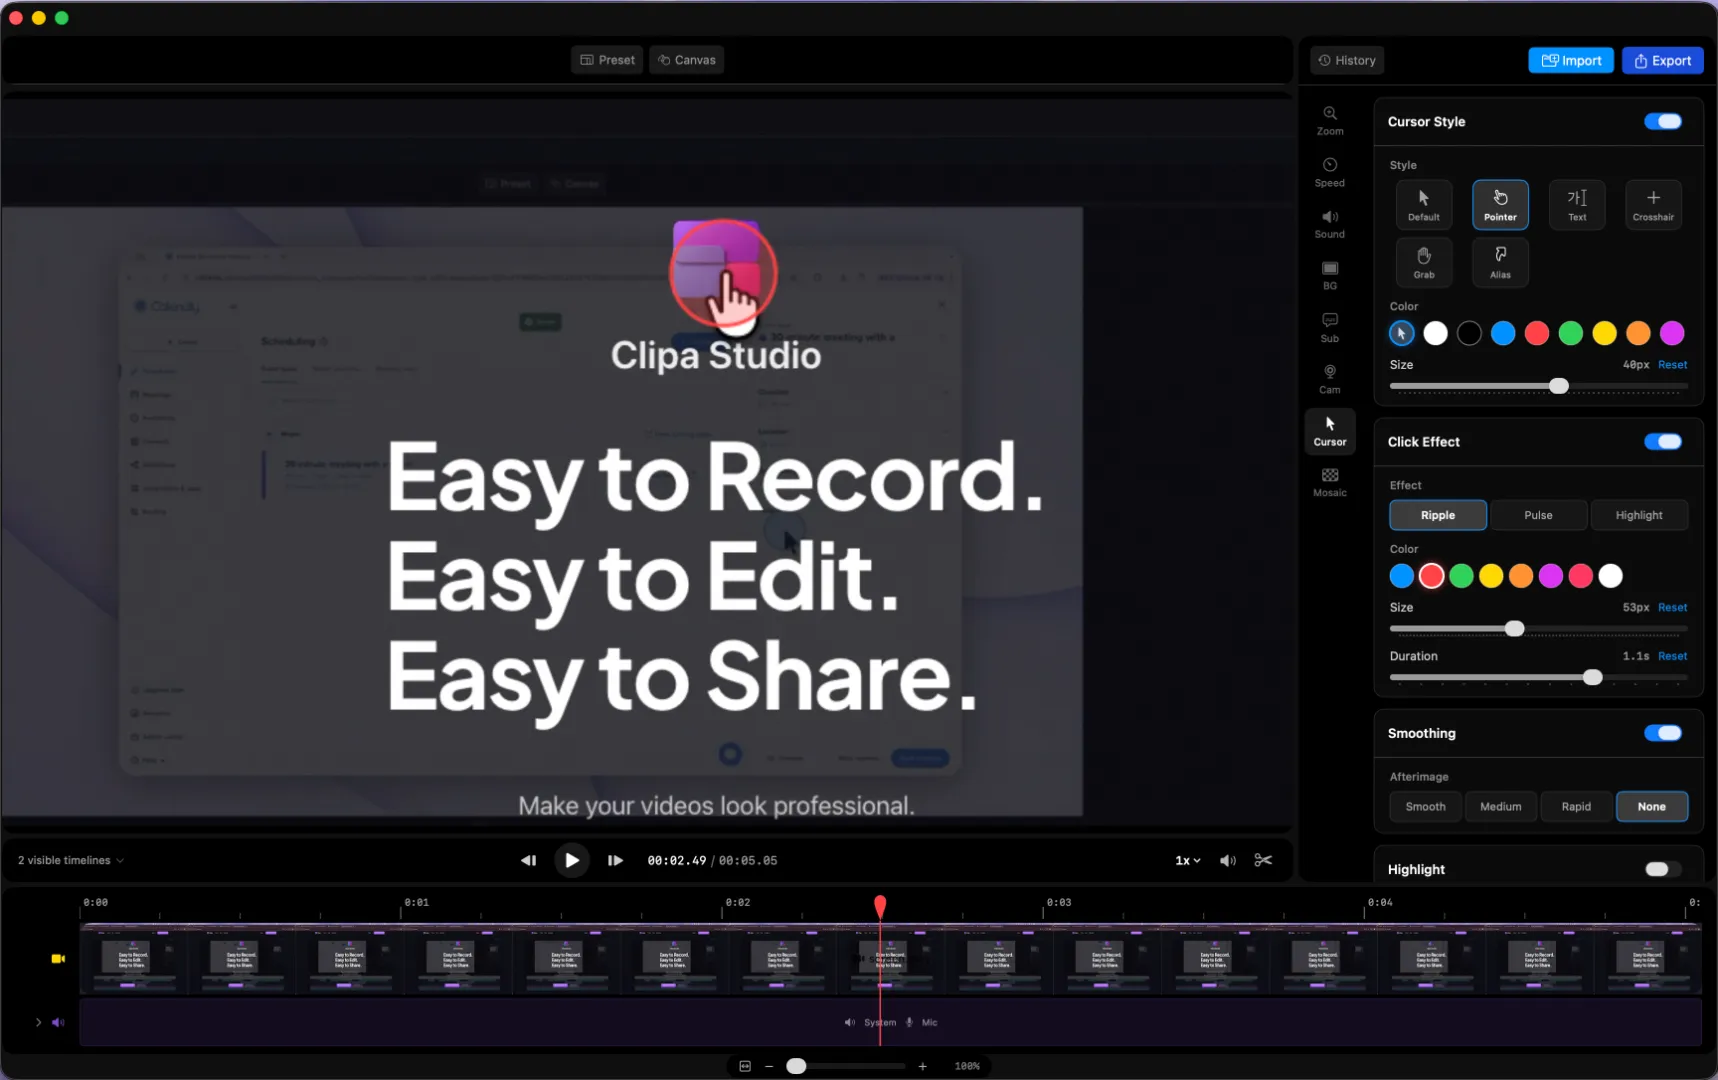
Use the camera overlay when trust or personality matters. A founder update, sales follow-up, or onboarding walkthrough can benefit from a face. A tight UI demo may not need it. When you do use camera, review its timing after cuts. The overlay should support the demo, not compete with it.
Record in passes, then edit for attention
You do not need a flawless single take. Record the demo in passes. One pass can capture the main path. Another can capture a cleaner ending state. A third can capture a close-up of a feature that needs more visual clarity. If a pass is bad, keep moving and fix it in the edit.
In Clipa, cut obvious mistakes first. Remove dead air around loading states, repeated clicks, and navigation that does not support the story. Then join neighboring cuts where the viewer should feel one continuous action. If the clip has narration, keep the audio rhythm natural. A demo that sounds chopped can lose trust even when the screen path is correct.
After the rough cut, add focus. Use zoom on the clicks that explain the feature. Add blur or mosaic when a field includes sensitive information. Crop or reposition imported clips when the original capture does not match the final layout. If system audio or microphone timing matters, review it after speed changes. Clipa's recent release notes call out system audio following speed changes to maintain sync, which is useful when you tighten a demo without making it feel broken.
Keep technical quality practical
Mac screen capture is not just a red button. Apple describes ScreenCaptureKit as a framework for high-performance frame capture of screen and audio content with fine-grained selection. That is the kind of foundation a native Mac recording app can build on.
For the creator, the practical questions are simpler. Can viewers read the UI? Does the cursor tell them where to look? Does the audio match the screen? Does the exported clip look like the editor preview?
Use these checks before export:
- Scrub through every cut edge.
- Watch zoom ranges near the start and end of clips.
- Listen for audio drift after speed edits.
- Confirm camera overlay timing if you used one.
- Check that masks, shadows, crops, and blur areas match the visible frame.
These details are easy to miss in a raw capture. They are also the details that make a demo feel credible.
Export for the channel, not the editor
A product demo video should be exported for where it will be watched. A launch page clip needs a clean loop or clear ending frame. A changelog clip can be more direct. A support article may need enough context for a user to repeat the steps. A social preview should make the core action visible quickly.
Clipa includes export presets for common channels and custom exports for tighter control. Apple’s AVAssetExportSession documentation describes export sessions as using presets, output file types, and output URLs. Apple also documents export presets for standard sizes and formats. For a product team, the useful takeaway is simple: export is part of the story. Do not treat it as a final button press.
Review the exported file outside the editor. Open it like a buyer, user, or teammate would. If the demo will sit on a website, check it in the page context. If it will be shared in a support thread, check whether the first frame explains what the clip is about.
A practical product-demo checklist
Use this checklist before you publish the demo:
- The opening screen shows the problem or feature context.
- The cursor never hides the main action.
- Every zoom supports understanding.
- Cuts remove friction without changing the truth of the workflow.
- Audio sounds continuous after edits.
- Sensitive information is hidden before export.
- The final frame supports the next step.
- The exported clip matches the editor preview.
This is where Clipa's value becomes clear. It is not just a recorder and not just a timeline. It is a Mac-native workflow for turning a software walkthrough into a demo that feels ready to share.
Final thought
A product demo video on Mac should make the product easier to understand than the product page alone. Start with the result you want the viewer to remember. Record the smallest useful path. Use zoom and cuts to guide attention. Export for the channel where the clip will live.
If you want to record, edit, and export your next product demo in one native Mac workflow, download Clipa at https://www.clipa.studio.