
Add subtitles to video on Mac when your screen recording needs to work on mute, support review, or become a clearer tutorial.
Subtitles are no longer a final polish step that happens after the real edit. For product demos, software tutorials, course lessons, and bug reports, they shape whether a viewer can follow the point at the exact moment it matters. A clean subtitle pass can rescue soft microphone audio, clarify a dense workflow, and make a short screen recording easier to scan.
The hard part is not only transcription. The hard part is keeping the subtitle work close to the recording, timeline, audio, and export settings. When those steps live in separate apps, tiny changes become expensive. You fix one sentence, re-export one clip, then discover that the timing moved after a trim.
Clipa Studio version 1.5.0 adds on-device subtitle generation, a transcript view, and the option to choose which audio source to use for transcription. That makes it a natural fit for a Mac workflow where the same project moves from recording to timeline review to final export.
Why Subtitles Matter for Mac Screen Recordings
Screen recordings ask viewers to process several signals at once. They watch the cursor, read the app interface, listen to narration, and remember the goal of the demo. Subtitles reduce that load. They turn spoken explanation into visible structure.
They also help in common viewing situations. A teammate may open a bug report in a noisy office. A student may replay a tutorial with the volume low. A creator may publish a vertical clip where the first seconds need to be clear before sound is enabled.
For Mac videos, subtitles are especially useful because UI text can be small. A narrator might say, "open the export menu," while the cursor moves quickly through a toolbar. A short subtitle can slow the viewer's understanding without slowing the video itself.
This is where a native Mac editor helps. Apple describes ScreenCaptureKit as a framework for high-performance video and audio capture across Apple platforms, which is the kind of foundation modern Mac recorders build around. You can read Apple's overview here: ScreenCaptureKit. After capture, export quality still matters. Apple's AVFoundation export documentation explains that export workflows are configured around presets, output file types, and output URLs: AVAssetExportSession.
Those details matter because subtitles are part of the final viewing experience. The clearest transcript can still feel rough if the export is blurry, the audio is clipped, or the subtitle timing drifts after edits.
How to Add Subtitles to Video on Mac in Clipa
Start with a recorded or imported video in Clipa. If you are making a new screen recording, capture the exact app window, screen, or area that supports the lesson. Keep the microphone close enough for clean speech. If your video includes system audio, decide whether the subtitle text should follow your microphone, the app sound, or a mixed track.
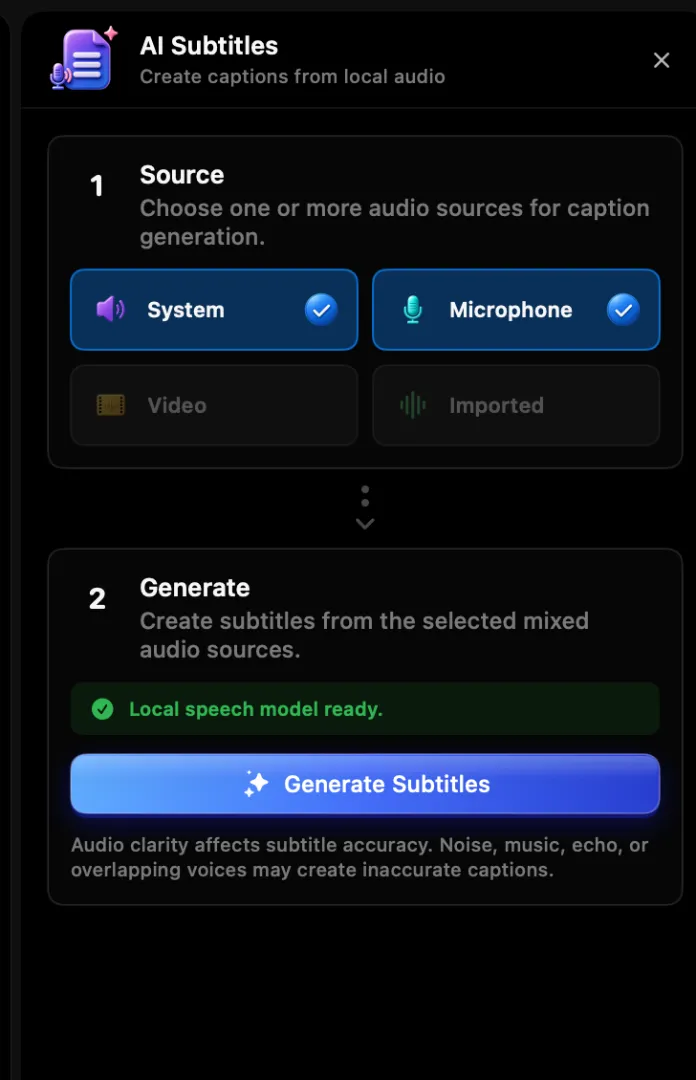
In Clipa 1.5.0, subtitle generation runs locally on your Mac. That matters for a practical reason. You can stay in the same project while the app prepares the required files, analyzes the selected audio, and creates subtitle markers for the timeline. The release also adds a transcript-style panel, so review does not have to happen one tiny clip at a time.
A simple workflow looks like this:
- Record or import the video.
- Pick the audio source that contains the speech you want transcribed.
- Generate subtitles locally.
- Review the transcript for product names, shortcuts, and technical terms.
- Adjust subtitle timing around trims, pauses, and zoom moments.
- Style the subtitles so they stay readable over the screen.
- Export the finished video and watch the export once from start to finish.
That last step sounds obvious, but it catches the mistakes that matter most. Subtitles are a promise to the viewer. If the text is off by a second during a key click, the video feels less trustworthy.
Step 1: Prepare Clean Audio Before Generating Subtitles
Good subtitles begin before you press the subtitle button. Speech recognition works best when the spoken track is clear, consistent, and not buried under music or app audio. You do not need studio sound for a screen tutorial, but you do need enough separation for the transcript to understand what was said.
If you are recording a tutorial, do a short test first. Say one sentence that includes a product name, a menu item, and a shortcut. Play it back in Clipa. If you struggle to hear the sentence, the transcript will probably struggle too.
If the project already exists, look at the timeline before generating subtitles. Remove long dead air, obvious false starts, and sections you know will not ship. This keeps the transcript shorter and makes review faster. Do not over-edit first, though. If you are still moving big sections around, generate subtitles after the main structure is stable.
For videos with multiple sound sources, choose the track with the clearest speech. A product demo might include your microphone and system audio. A course clip might include narration plus background music. Clipa's audio-source selection lets you aim subtitle generation at the voice that should become text.
Step 2: Review the Transcript Like an Editor
Automatic subtitles are a first pass, not a final proof. The transcript review is where a good video becomes publishable.
Start by fixing terms that a general speech model may not know. Product names, API names, keyboard shortcuts, file formats, and acronyms deserve special attention. Then read for meaning. Spoken sentences often work in a voiceover but feel long on screen. Break long subtitle lines into shorter thoughts when the timing allows it.
A useful rule is to make each subtitle answer one viewer question: what should I look at now? If a sentence contains setup, action, and explanation, split it. The viewer should not have to read a paragraph while also watching a cursor path.
The transcript view in Clipa helps because it gives you a larger text surface while keeping the timeline nearby. You can treat the subtitle pass as an edit pass. Fix the words, then check the moment in the video.

Step 3: Style Subtitles for Screen Content
Subtitles for screen recordings need different styling from subtitles for talking-head video. The background is often busy. There may be code, buttons, forms, or a browser address bar behind the text.
Keep the font simple. Use strong contrast. Place subtitles where they do not cover the action. The lower third is a common starting point, but it is not always right for software demos. If the app's important controls sit at the bottom of the screen, move the subtitles higher or use a background treatment.
Avoid making every subtitle too large. Large text feels readable for one sentence, then starts to hide the interface. The goal is not to dominate the screen. The goal is to support the recording.
If your video includes zoom effects, review subtitles around those moments. A zoom can make UI detail easier to see, but it can also push subtitle text into a busier part of the frame. Check the whole sequence at normal playback size.
Step 4: Keep Timing Stable While You Edit
Subtitle timing is most fragile after timeline edits. A trim at the beginning of the video can move every later line. A speed change can make a previously good caption feel early or late. A deleted pause can make two subtitle lines collide.
Work in this order when possible:
- Finish the broad edit.
- Generate and review subtitles.
- Make small subtitle timing fixes.
- Export.
If you need to change the edit after subtitle review, check only the affected section first. Then check the transition before and after it. You do not always need to reread the full transcript, but you do need to verify timing around each edit boundary.
This is one advantage of keeping subtitle work inside the same editor. You can see the relationship between video clips, audio waveform, zoom effects, and subtitle markers. The less you move between apps, the less you have to reconstruct that relationship from memory.
Step 5: Export With the Viewer in Mind
Before export, decide where the video will live. A YouTube tutorial, a product update, and a support bug report can all use subtitles, but they do not need the same export settings.
For YouTube or a course library, prioritize clarity. UI text should stay sharp after upload compression. For a quick bug report, file size may matter more. For social clips, check whether the subtitle placement survives a vertical or square crop.
Apple's Final Cut Pro documentation is a useful reminder that caption workflows can mean different things. Apple distinguishes caption creation, caption validation, and formats such as CEA-608, iTT, and SRT in its support materials: Final Cut Pro caption validation. In Clipa's screen-recording workflow, think first about the visible subtitles in the exported video. If a publisher requires a separate caption file, confirm that requirement before you start.
After export, watch the finished file outside the editor. Check these points:
- The first subtitle appears when speech starts.
- Product names and commands are spelled correctly.
- Subtitles do not cover the click target or menu being explained.
- The final line disappears at a natural moment.
- The video is readable at the size where people will actually watch it.
This final review is short, but it protects the whole project.
When to Use Clipa, QuickTime, or Final Cut Pro
QuickTime Player is convenient for basic Mac capture and playback, but subtitle editing is not its job. It is useful when you need a fast recording and no post-production workflow.
Final Cut Pro is powerful when you need a full professional editing environment. Apple's own guide shows automatic caption generation in Final Cut Pro and notes requirements around Apple silicon and language support: Create closed captions in Final Cut Pro for Mac. That makes it a strong option for larger productions that already belong in Final Cut.
Clipa fits the middle path for screen-recording work. It is built around recording, zooming, timeline cleanup, subtitle review, and export in one native Mac workflow. That is the lane most tutorial makers, SaaS teams, educators, and support teams need every week.
If the project begins as a screen recording and ends as a polished walkthrough, keeping everything in Clipa can be faster than sending the file through a general editor. You get the subtitle pass close to the cursor movement, audio waveform, and export settings that shape the final result.
Common Subtitle Mistakes to Avoid
Do not generate subtitles before you know what the video is about. A transcript for a rough ten-minute take can waste more time than it saves.
Do not leave automatic text untouched. Even strong transcription can miss names, shortcuts, and UI labels.
Do not hide important interface details. If the subtitle covers the button you are explaining, move it.
Do not use subtitle styling as decoration. Keep it calm and readable.
Do not skip the final exported-file review. The editor preview is not the same as the file your viewer receives.
A Cleaner Mac Workflow for Subtitled Videos
The best way to add subtitles to video on Mac is to keep the work close to the recording. Capture clean audio, generate subtitles from the right source, review the transcript, style for screen content, then export a file that still feels sharp and readable.
Clipa makes that workflow practical for people who create screen videos often. It gives you a Mac-native path from recording to subtitles to export without turning every tutorial into a heavyweight editing project.
Start your next subtitled screen recording with Clipa at https://www.clipa.studio.