A software tutorial video works when viewers can see every click, hear the reason, and follow the task without pausing.
A good tutorial is not just a screen recording. It is a guided path through one software task. The viewer should know what they are about to learn, where to look, and what changed after each action. That is harder on Mac than it sounds because software interfaces are dense. Menus, small buttons, modals, cursor movement, and system permission prompts can all compete for attention.
This guide shows a practical way to make a software tutorial video on Mac with Clipa Studio. The workflow starts before recording. You define the outcome, clean the screen, capture a focused take, edit for readability, and export a file that fits where the tutorial will live.
Start with the software tutorial video outcome
The fastest way to make a tutorial confusing is to teach too much at once. Pick one result the viewer wants. That result might be setting up a workspace, importing a file, changing a preference, or publishing a project.
Write the outcome as a sentence before you open the recorder. For example: "By the end, the viewer can export a trimmed product walkthrough as an MP4." That sentence gives you a boundary. Anything that does not help the viewer reach that result can be cut.
Then list the visible steps. Use verbs that match what the viewer will see on screen. Open, select, drag, rename, export, and review are better than explain, discuss, or introduce. A software tutorial video is visual. The script should follow visible actions.
Keep one short note for each step. You do not need a full teleprompter unless the tutorial is formal training. A lightweight outline gives you enough structure while leaving room for natural narration.
Prepare the Mac screen before recording
Mac screen recordings are easier to edit when the source capture is clean. Close unrelated windows. Hide private tabs. Turn off notifications. Move the app you are teaching into a stable position so the viewer does not need to chase it around the screen.
Apple's built-in Mac recording tools can record the entire screen, a window, or a selected area. Apple also documents microphone options and pointer visibility in its Mac screen recording guide. Those same setup decisions matter when you use a dedicated editor like Clipa.
For software tutorials, window or area capture is usually easier to follow than full-screen capture. It reduces visual noise and keeps text larger. Full-screen capture is useful when the workflow spans several apps or when menu bar context matters.
Also check screen and audio permissions before the real take. macOS controls access to screen and system audio recording in Privacy & Security settings. Apple explains that apps may need authorization under Screen & System Audio Recording. If the permission prompt appears during the tutorial, stop and restart the take after granting access.
Record a cleaner first take in Clipa
Open Clipa and choose the capture mode that matches the tutorial. Use display capture when the tutorial needs the full Mac context. Use window capture when the viewer only needs one app. Use area capture when the lesson is about a small part of an interface.
Before pressing record, rehearse the first thirty seconds. Make sure the cursor starts in a neutral location. Open the exact file or screen you plan to teach from. Reset the app state if needed. A clean first frame helps the viewer understand the task quickly.
Narrate actions before or during the click. Say what you are doing and why it matters. "Click Export because this is where format and resolution are set" is clearer than "Now click here." Viewers often watch tutorials while using the same app. Specific narration helps them recover when they miss a step.
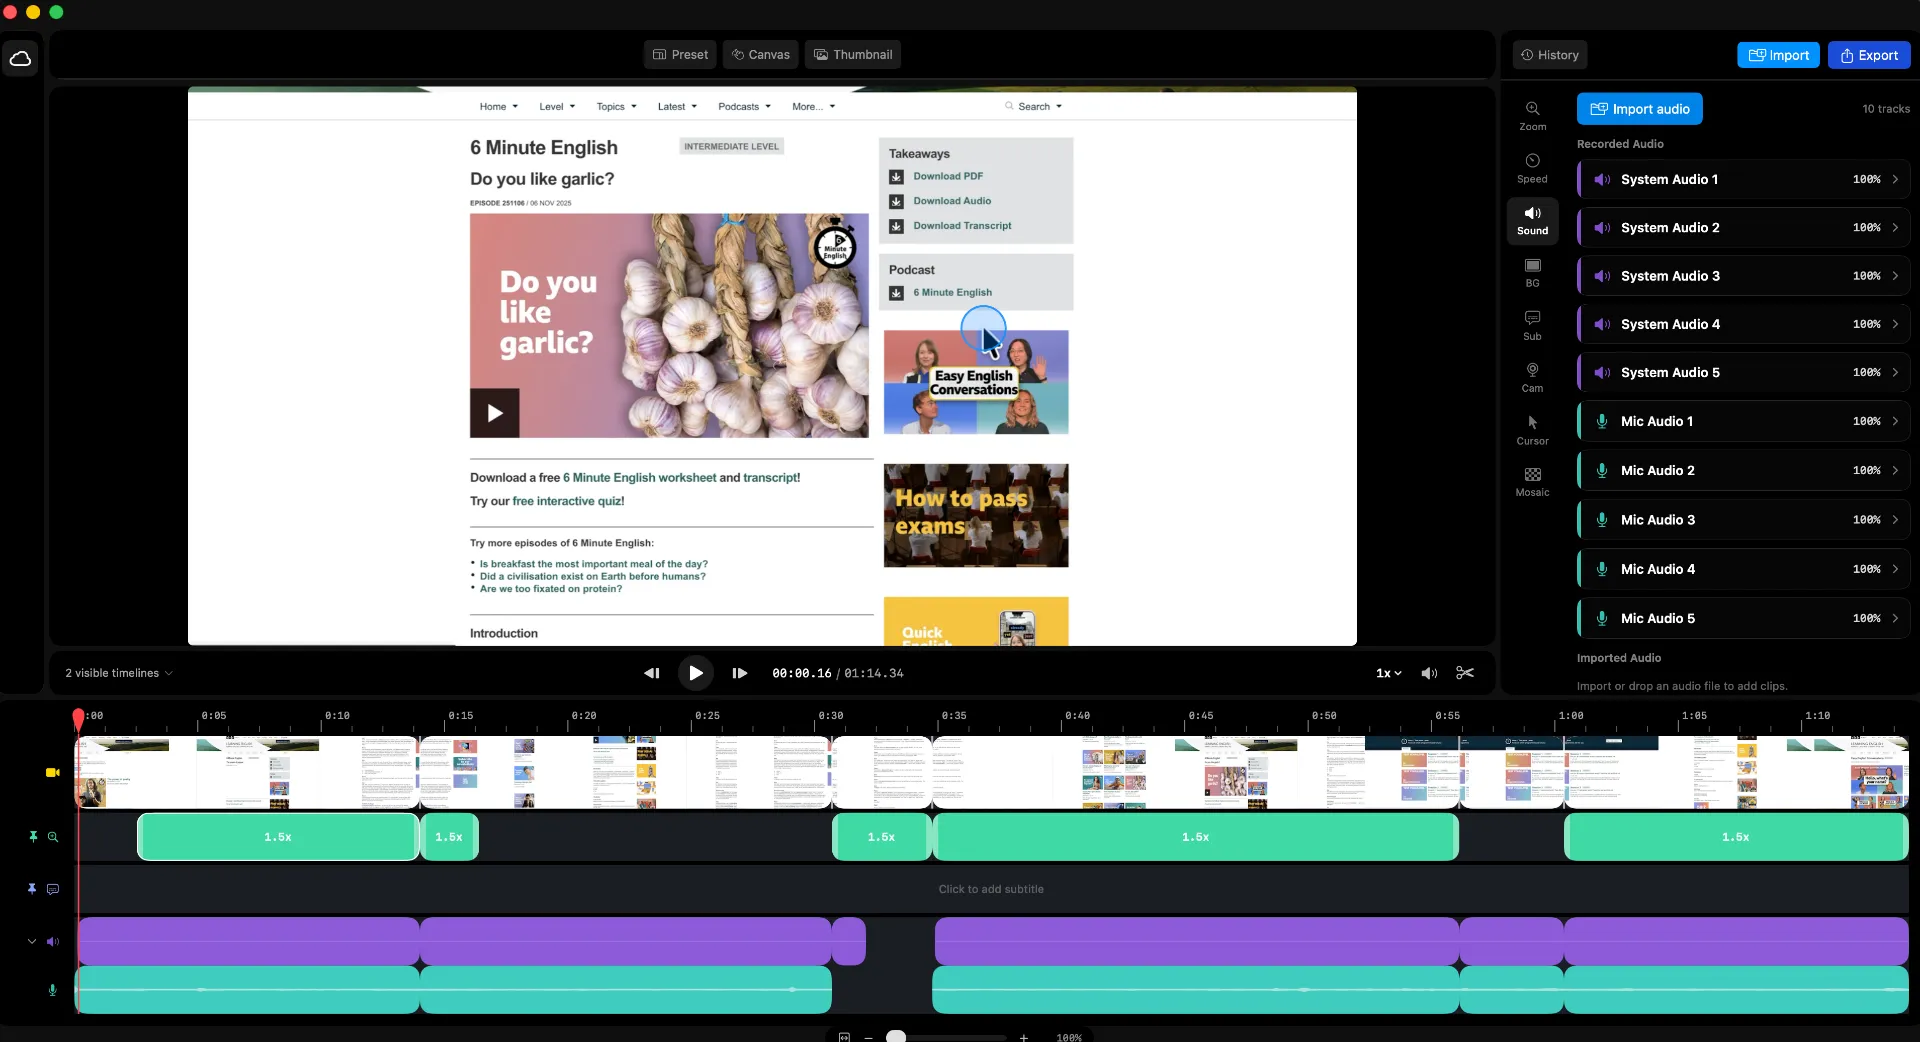
If the tutorial includes system audio, microphone audio, or camera overlay, do a short test recording first. Listen for room noise. Check that your voice does not cover important app sounds. Review whether the camera blocks a menu or button.
Clipa is built for Mac screen recording and editing in one workflow. That means you can move from capture into the editor without treating the raw take as the final tutorial.
Edit for readability, not decoration
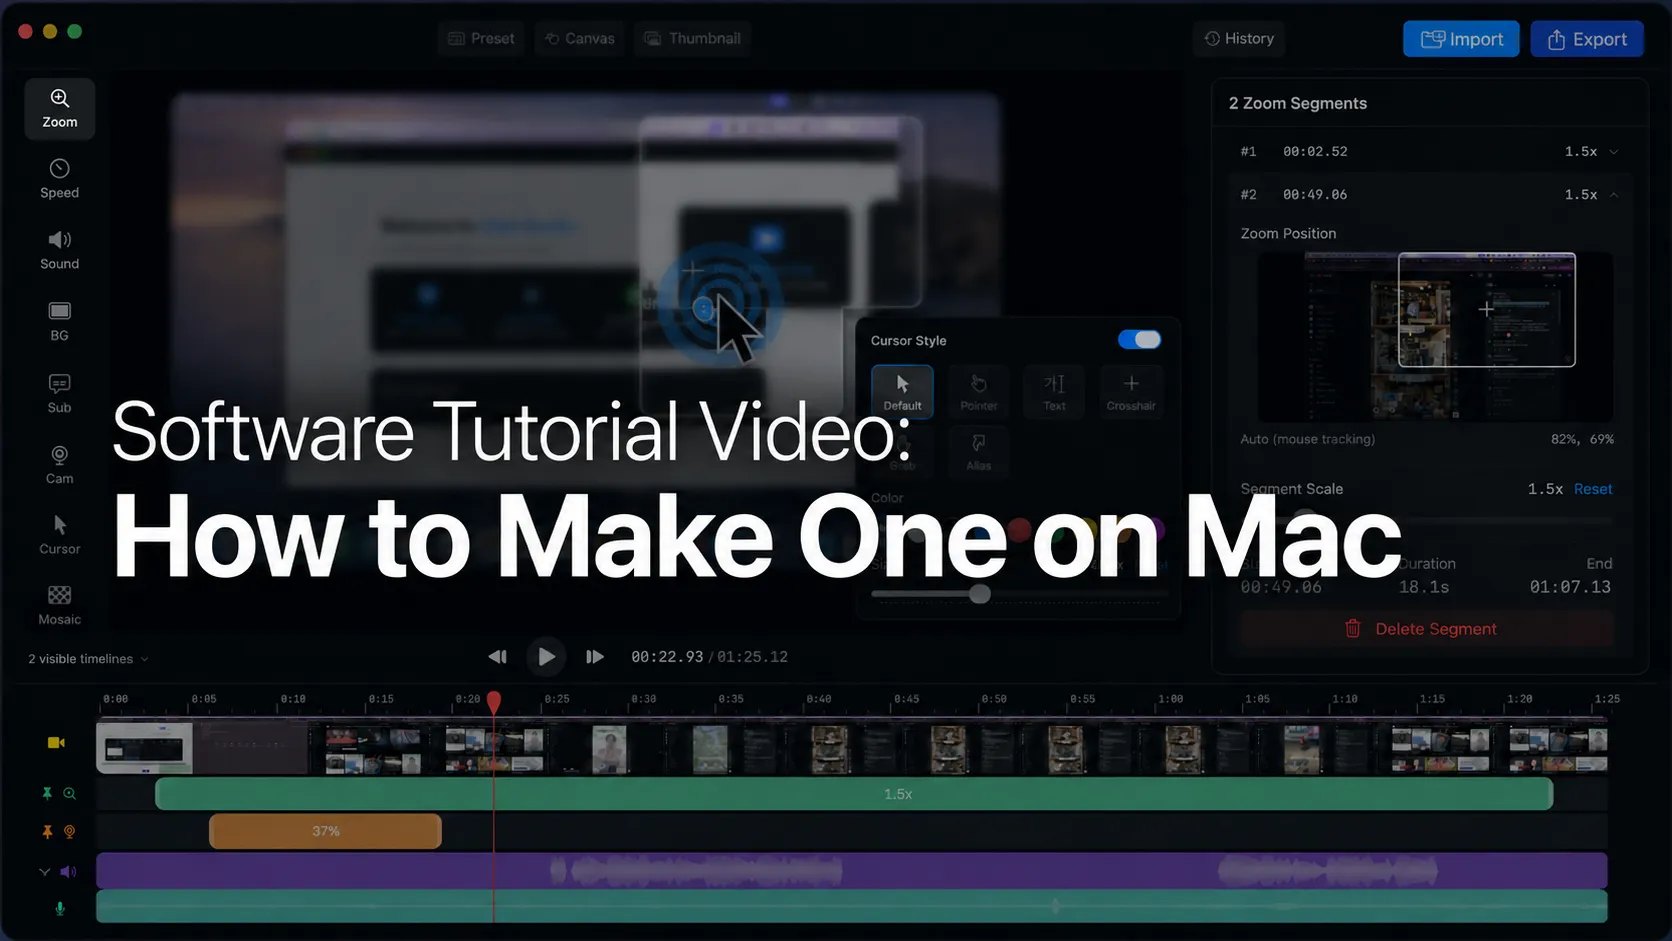
The most important edit in a software tutorial video is often a zoom. Small controls are easy to miss after upload compression. They are even harder to see on a phone or in a small embedded player.
Clipa's click-based zoom workflow is useful here because tutorial emphasis is tied to the viewer's attention. Add a zoom segment when the cursor moves to a small button, menu item, field, or setting. Keep the zoom long enough for the viewer to read the target. Then return to the wider view so they understand where the action sits in the app.
Cursor styling also matters. A default cursor can disappear over busy UI. Use cursor size, color, smoothing, or click effects when they make the step easier to follow. Avoid effects that feel louder than the instruction. The point is clarity.
Trim dead air around pauses, failed clicks, and long loading moments. If the viewer needs to wait, leave enough context to show that the app is processing. If nothing useful happens on screen, cut it.
For tutorials with repeated steps, use pacing edits instead of explaining the same motion every time. Show the first example slowly. Then speed through repeated setup while keeping the result visible.
Keep audio and pacing clear
Audio quality shapes trust. A viewer may forgive a simple visual style, but unclear narration makes a tutorial hard to use. Record in a quiet room. Keep the microphone distance stable. If you need to re-record a sentence, pause first so the edit point is easy to find.
Keep sentences short in the narration. Say one action per sentence when the UI is dense. Give the viewer time to look before moving to the next step.
Background music can help a product video, but it can hurt a software tutorial. If you use music, keep it low and leave narration in control. The viewer is there to learn a workflow, not to watch a montage.
When you review the edit, listen without watching. If the audio alone does not explain where the viewer is in the process, add a clearer line or on-screen emphasis. Then watch without sound. If the visuals do not show the sequence, add a zoom, trim, or cursor highlight.
Export for the place the tutorial will live
A software tutorial video may live on YouTube, in a help center, inside onboarding, or in a team workspace. Each destination changes the export decision.
For YouTube, use a clean title card or thumbnail and export at a resolution that keeps UI text readable. For a help center, prioritize clarity and file compatibility. For an internal team, a smaller file may be more useful than a large master export.
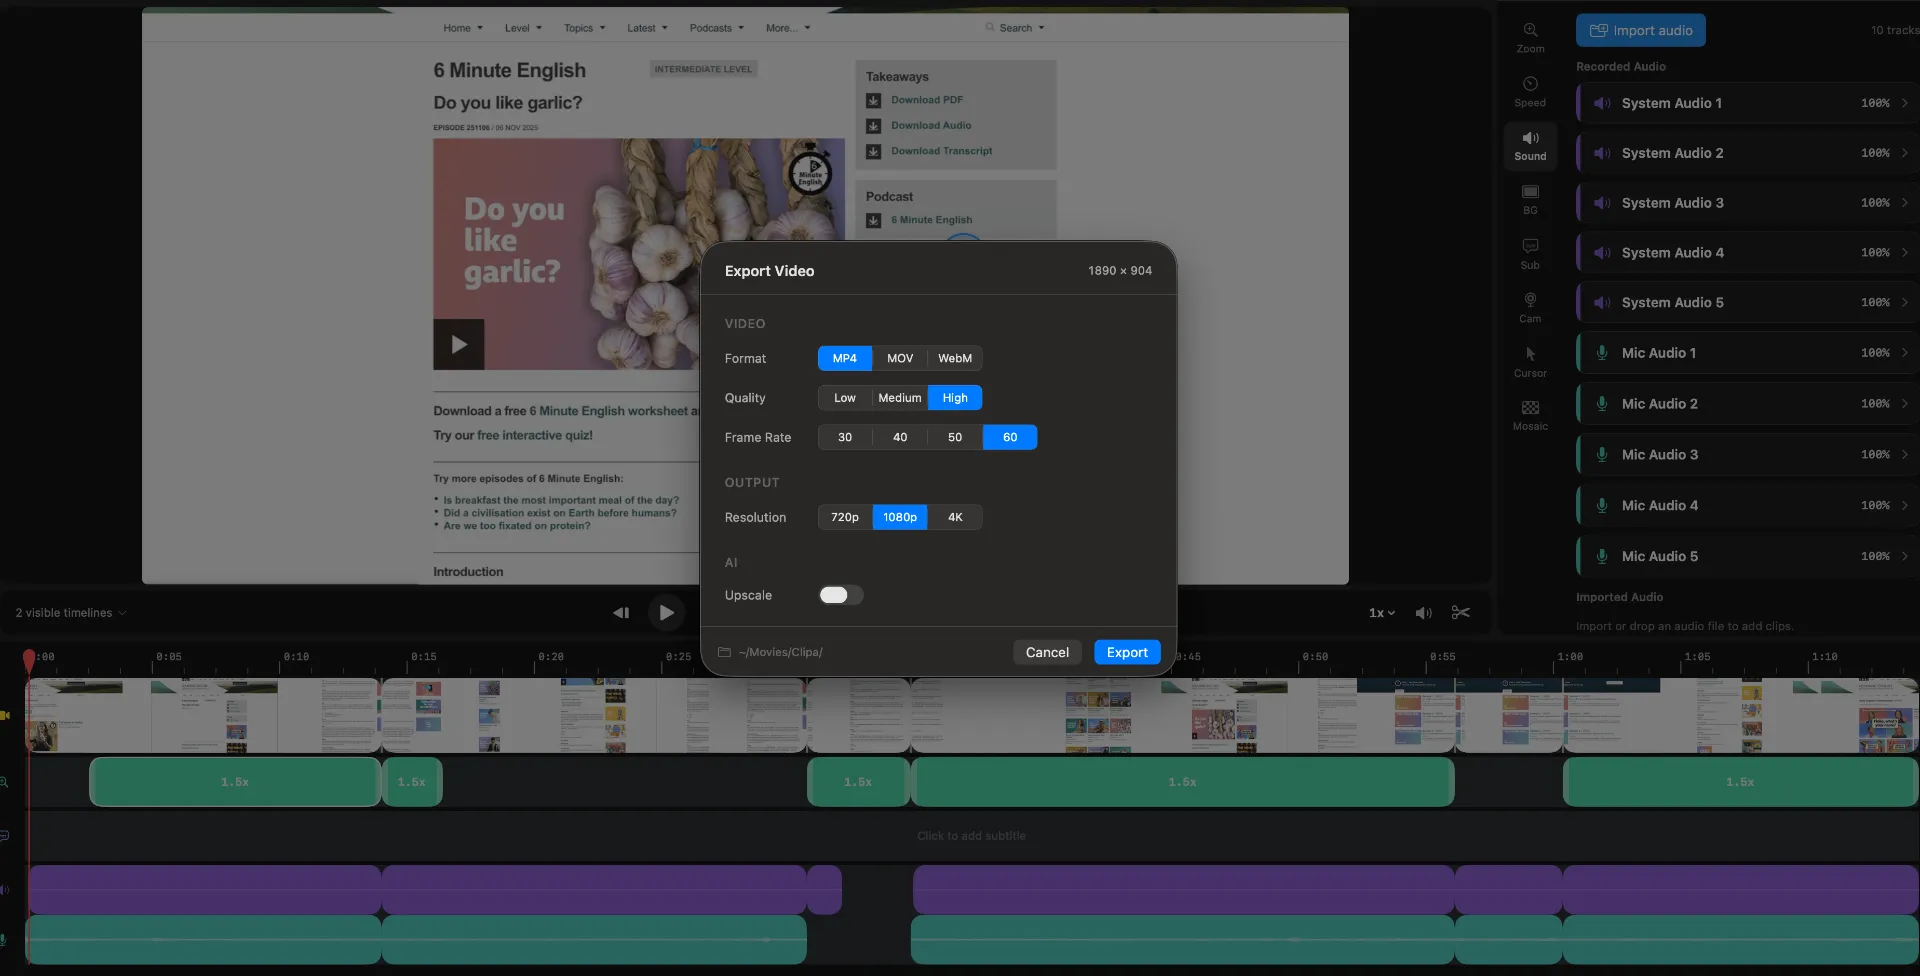
Apple's AVFoundation documentation describes AVAssetExportSession as a way to export assets with a preset, output file type, and output URL. It also notes that compatible file types depend on the export session configuration in AVAssetExportSession. That is the technical reason export settings should be chosen intentionally instead of treated as an afterthought.
In Clipa, review format, quality, frame rate, and resolution before export. If the tutorial includes fine UI text, check the exported file at the size where viewers will actually watch it. Do not judge readability only in the editor preview.
Use Cloud Storage when the tutorial becomes reusable
Many software tutorial videos are not one-off assets. Product teams update them after releases. Educators reuse intros and title cards. Support teams keep examples for recurring questions.
Clipa 1.3.0 added Cloud Storage for Pro users. The release also added a Cloud panel inside the editor, with upload, organization, management, and import workflows for cloud files. That makes the tutorial workflow easier when you want to keep reusable assets near the edit instead of hunting through folders.
Use cloud storage for assets you expect to reuse. Store intro clips, still images, brand screens, exported versions, or source media that may appear in future tutorials. Keep private customer data out of shared reusable assets unless you have explicit permission to use it.
Cloud does not replace the edit. It supports the workflow around the edit. The tutorial still needs a focused outcome, readable screen capture, clear audio, and a reviewed export.
A simple Clipa workflow for software tutorials
Use this sequence when you need a repeatable process:
- Define one viewer outcome.
- Prepare the Mac screen and grant recording permissions.
- Record the app window or focused area in Clipa.
- Add zoom segments where UI details are small.
- Style the cursor only when it improves clarity.
- Trim pauses and repeated actions.
- Review audio by listening without watching.
- Export for the publishing destination.
- Store reusable media if the tutorial will be updated later.
This workflow keeps the tutorial grounded in the viewer's task. It also prevents over-editing. You are not trying to make every second flashy. You are making every step understandable.
Final review before publishing
Before you publish, watch the exported file from the viewer's perspective. Ask three questions.
Can the viewer tell what the tutorial teaches in the first few seconds? If not, tighten the intro and show the outcome earlier.
Can the viewer see every important click? If not, add a zoom or cursor emphasis at the exact moment of action.
Can the viewer repeat the workflow without guessing? If not, add one clarifying sentence or split the tutorial into smaller parts.
A software tutorial video succeeds when the viewer can finish the task without needing a second explanation. Clipa helps by keeping recording, zoom edits, cursor clarity, audio review, export, and reusable assets in one native Mac workflow.
Try Clipa Studio at https://www.clipa.studio when you want to record, edit, and export clearer Mac software tutorials without moving between separate apps.